New Old Cottage Primary Bathroom Reveal
This post is sponsored by Barn Light Electric, however all opinions are explicitly my own. This post may contain affiliate links. For more information, you can read my full disclaimer here.
Today’s the day! I’m so excited to reveal our new-old cottage primary bathroom here on the blog and show you how this space looks now that construction is complete!
The Cottage Primary Bathroom Mood Board
If you’ve been following from the beginning, you might remember when I shared the Cottage Mood Boards to give you a preview at the design and our vision for the cottage.
Here’s a little look back at our original mood board for the primary bathroom.

The Cottage Primary Bathroom During Construction
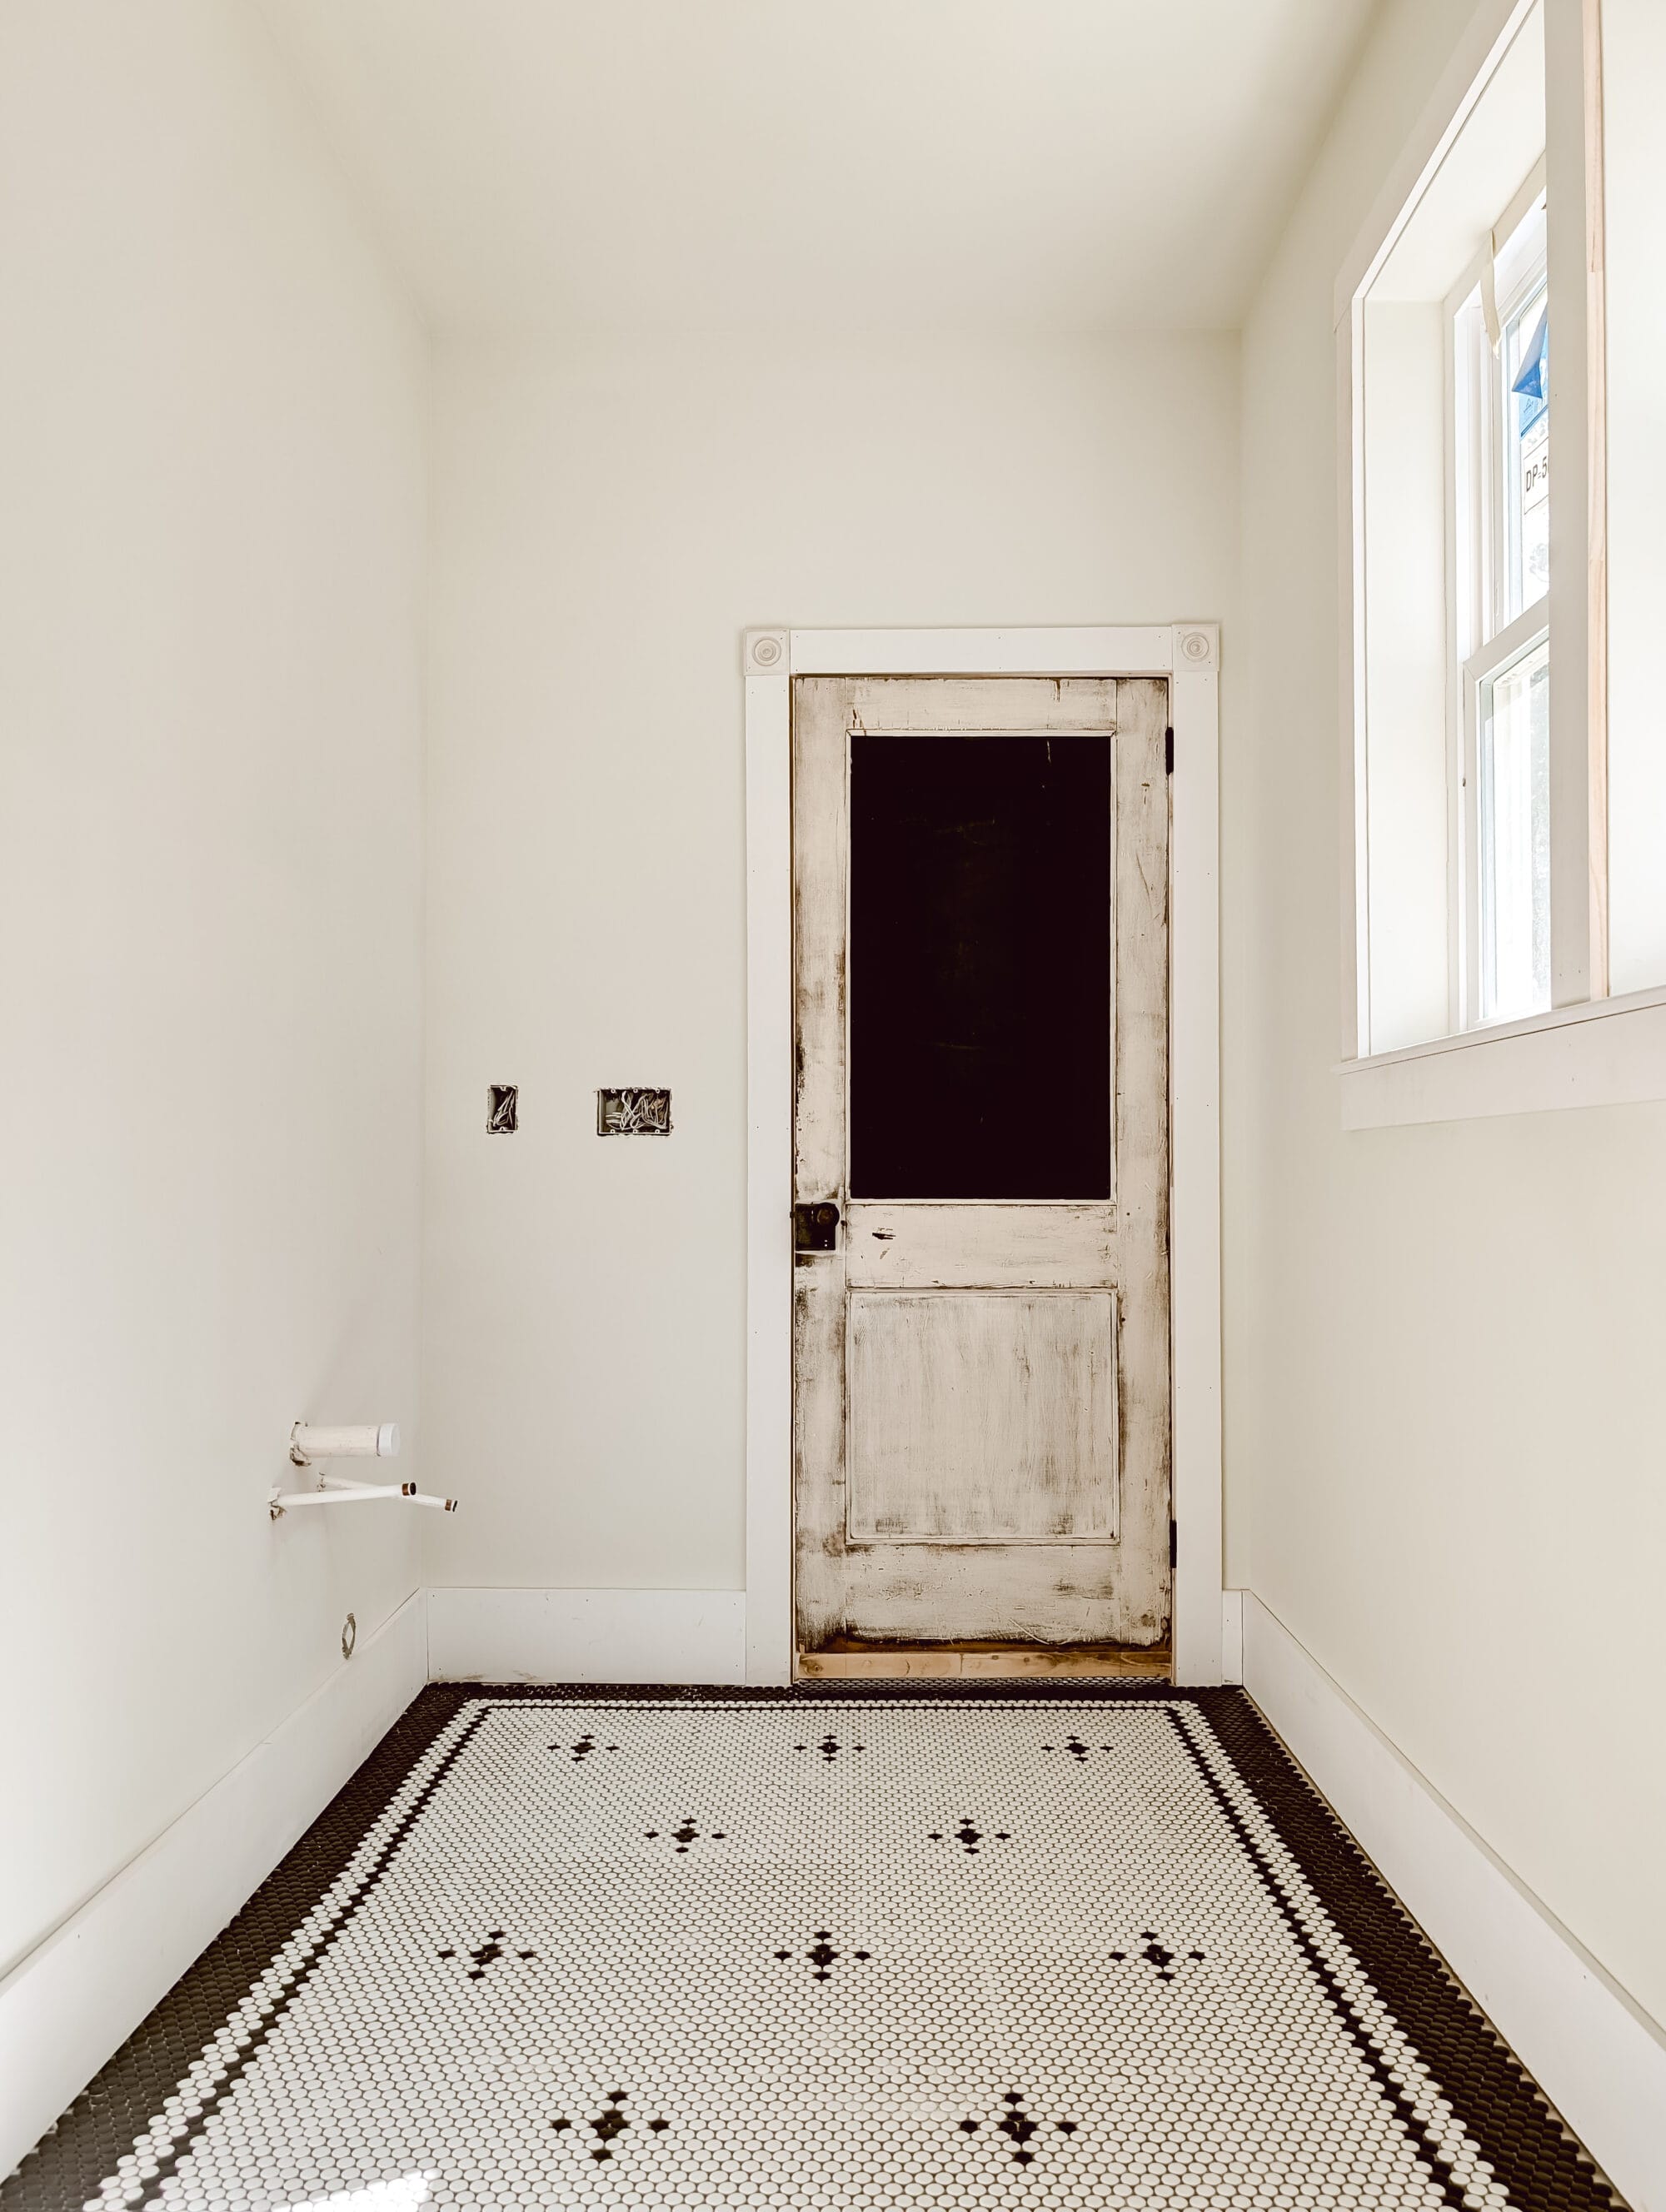
And here’s what the primary bathroom looked like the last time you saw it on the blog in my mid-construction cottage tour.

The antique door was in, the shower insert was installed, and I had just finished laying all the floor tile.
I don’t think I had even started on the grout when I shared these photos.

But I was so happy with how my DIY penny tile project turned out, so I snapped these photos as soon as the floor was dry enough to walk on so I could share it with you!
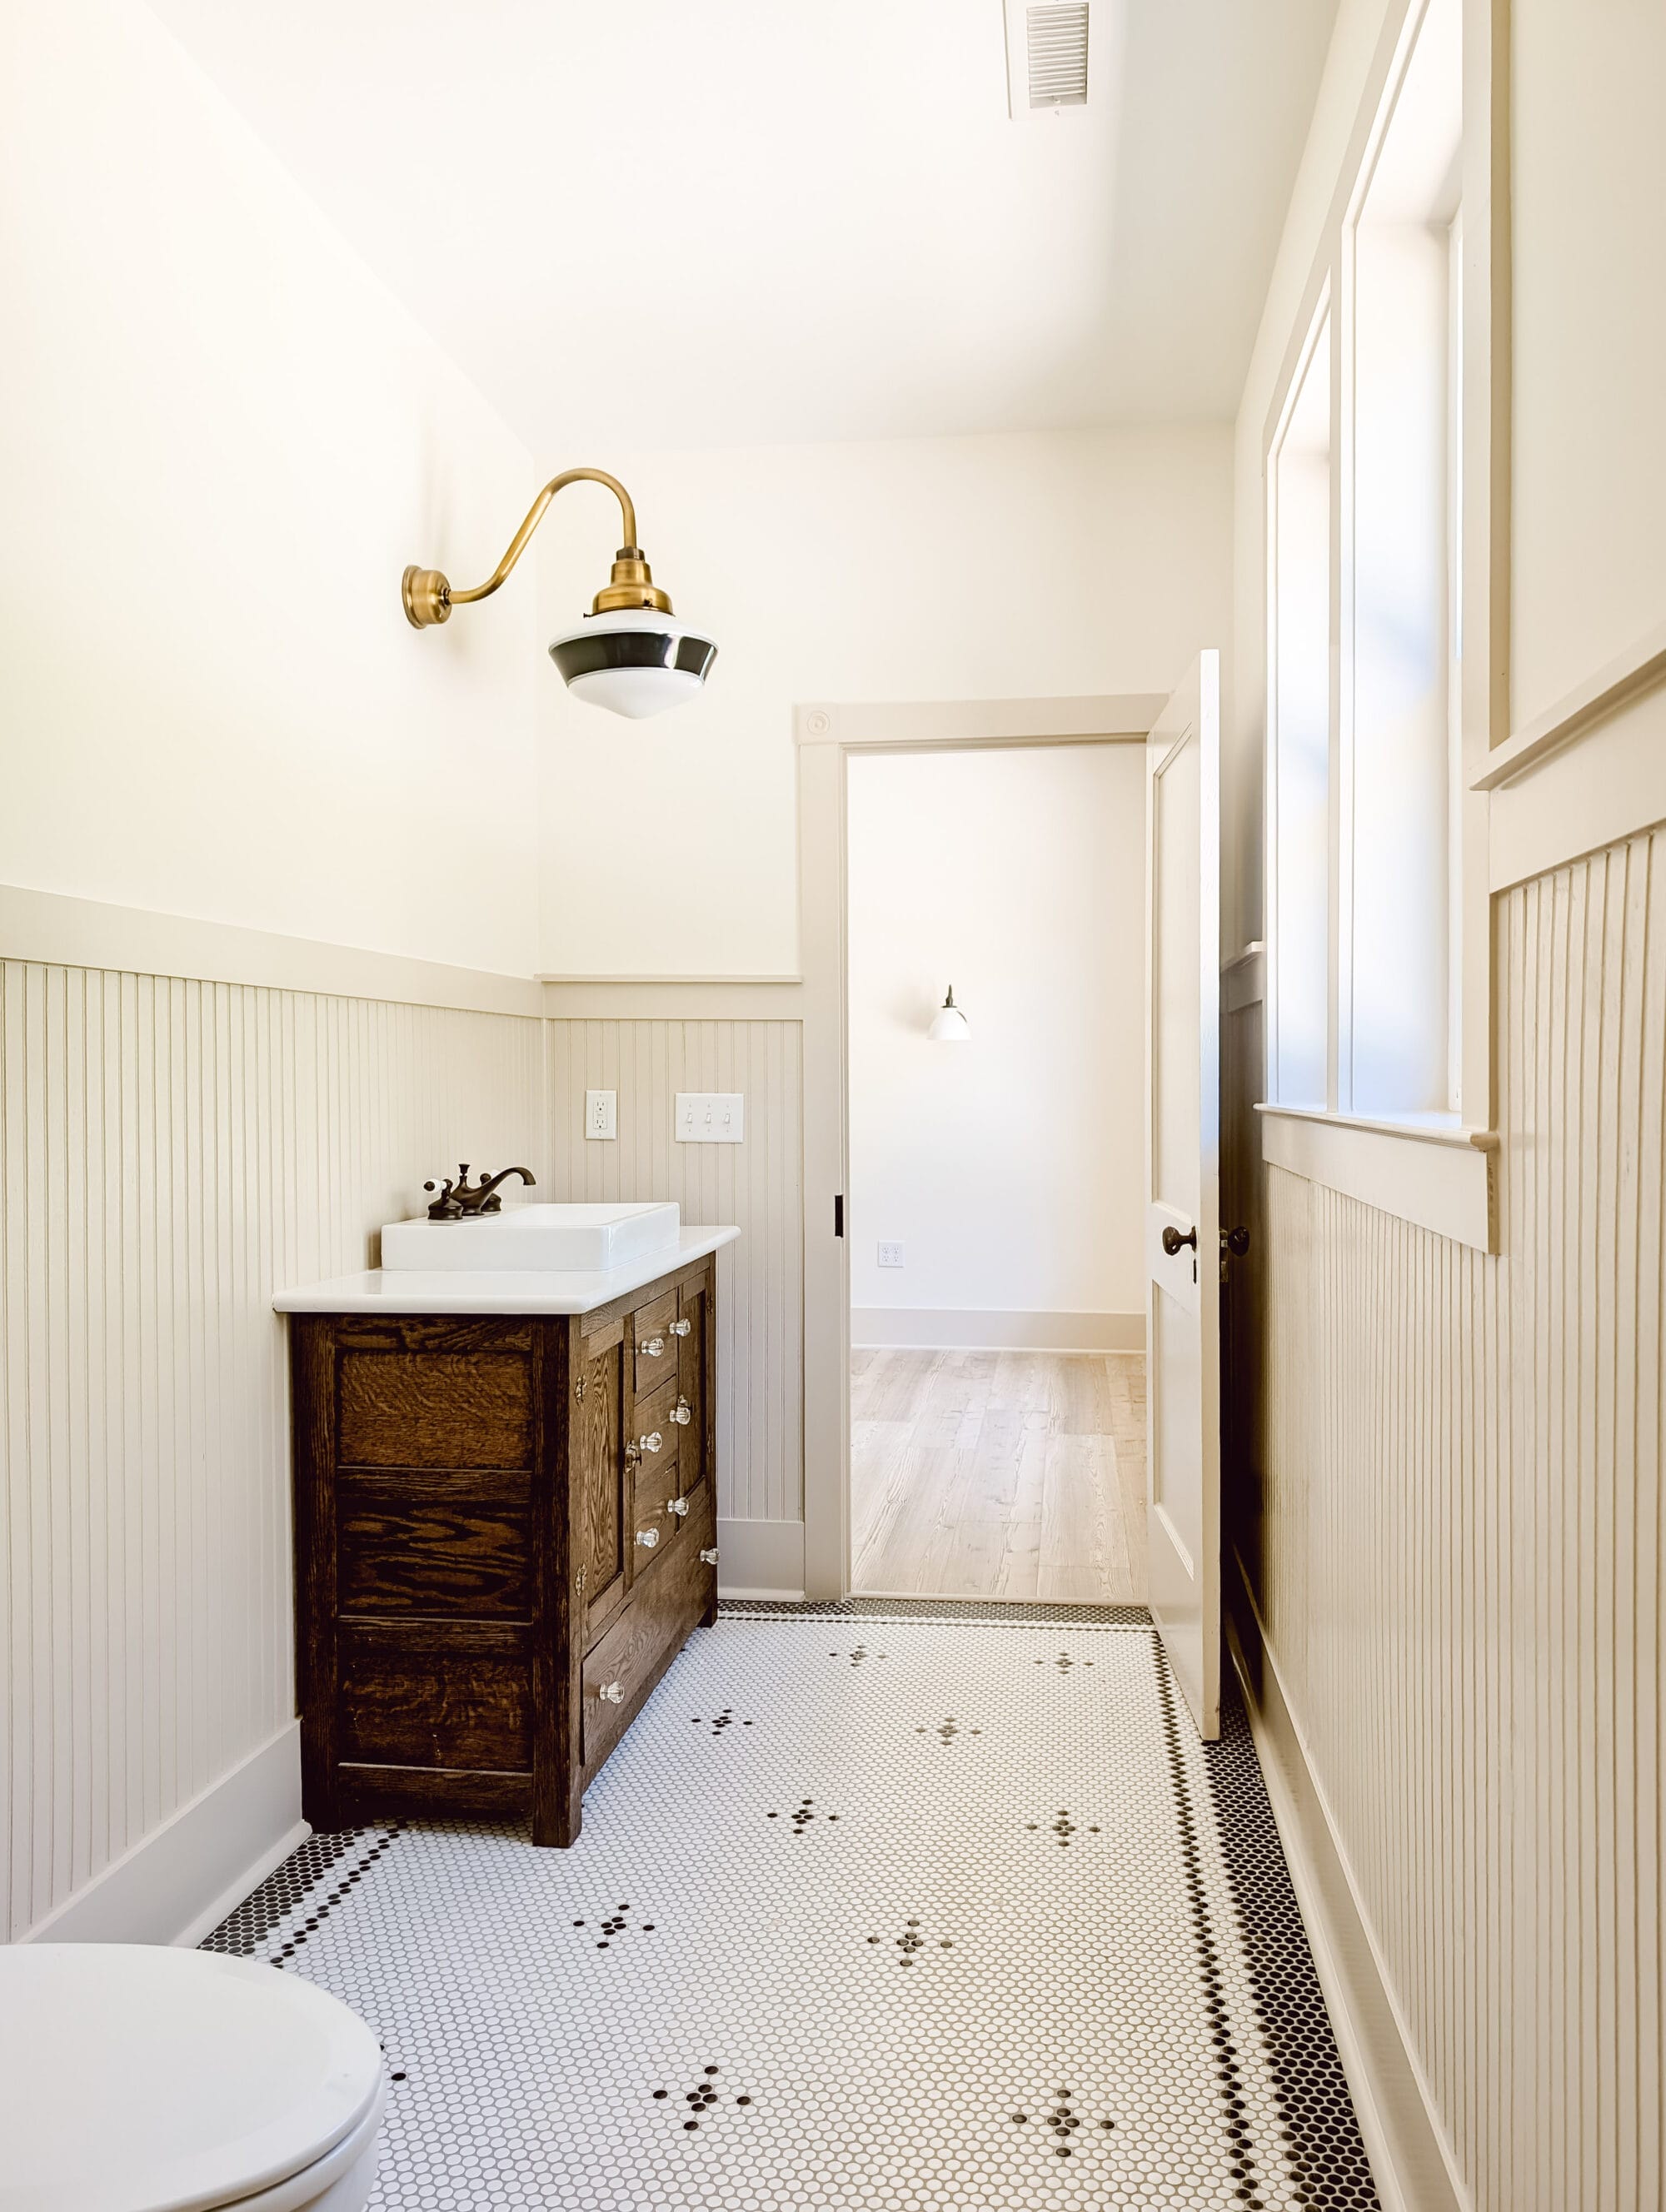
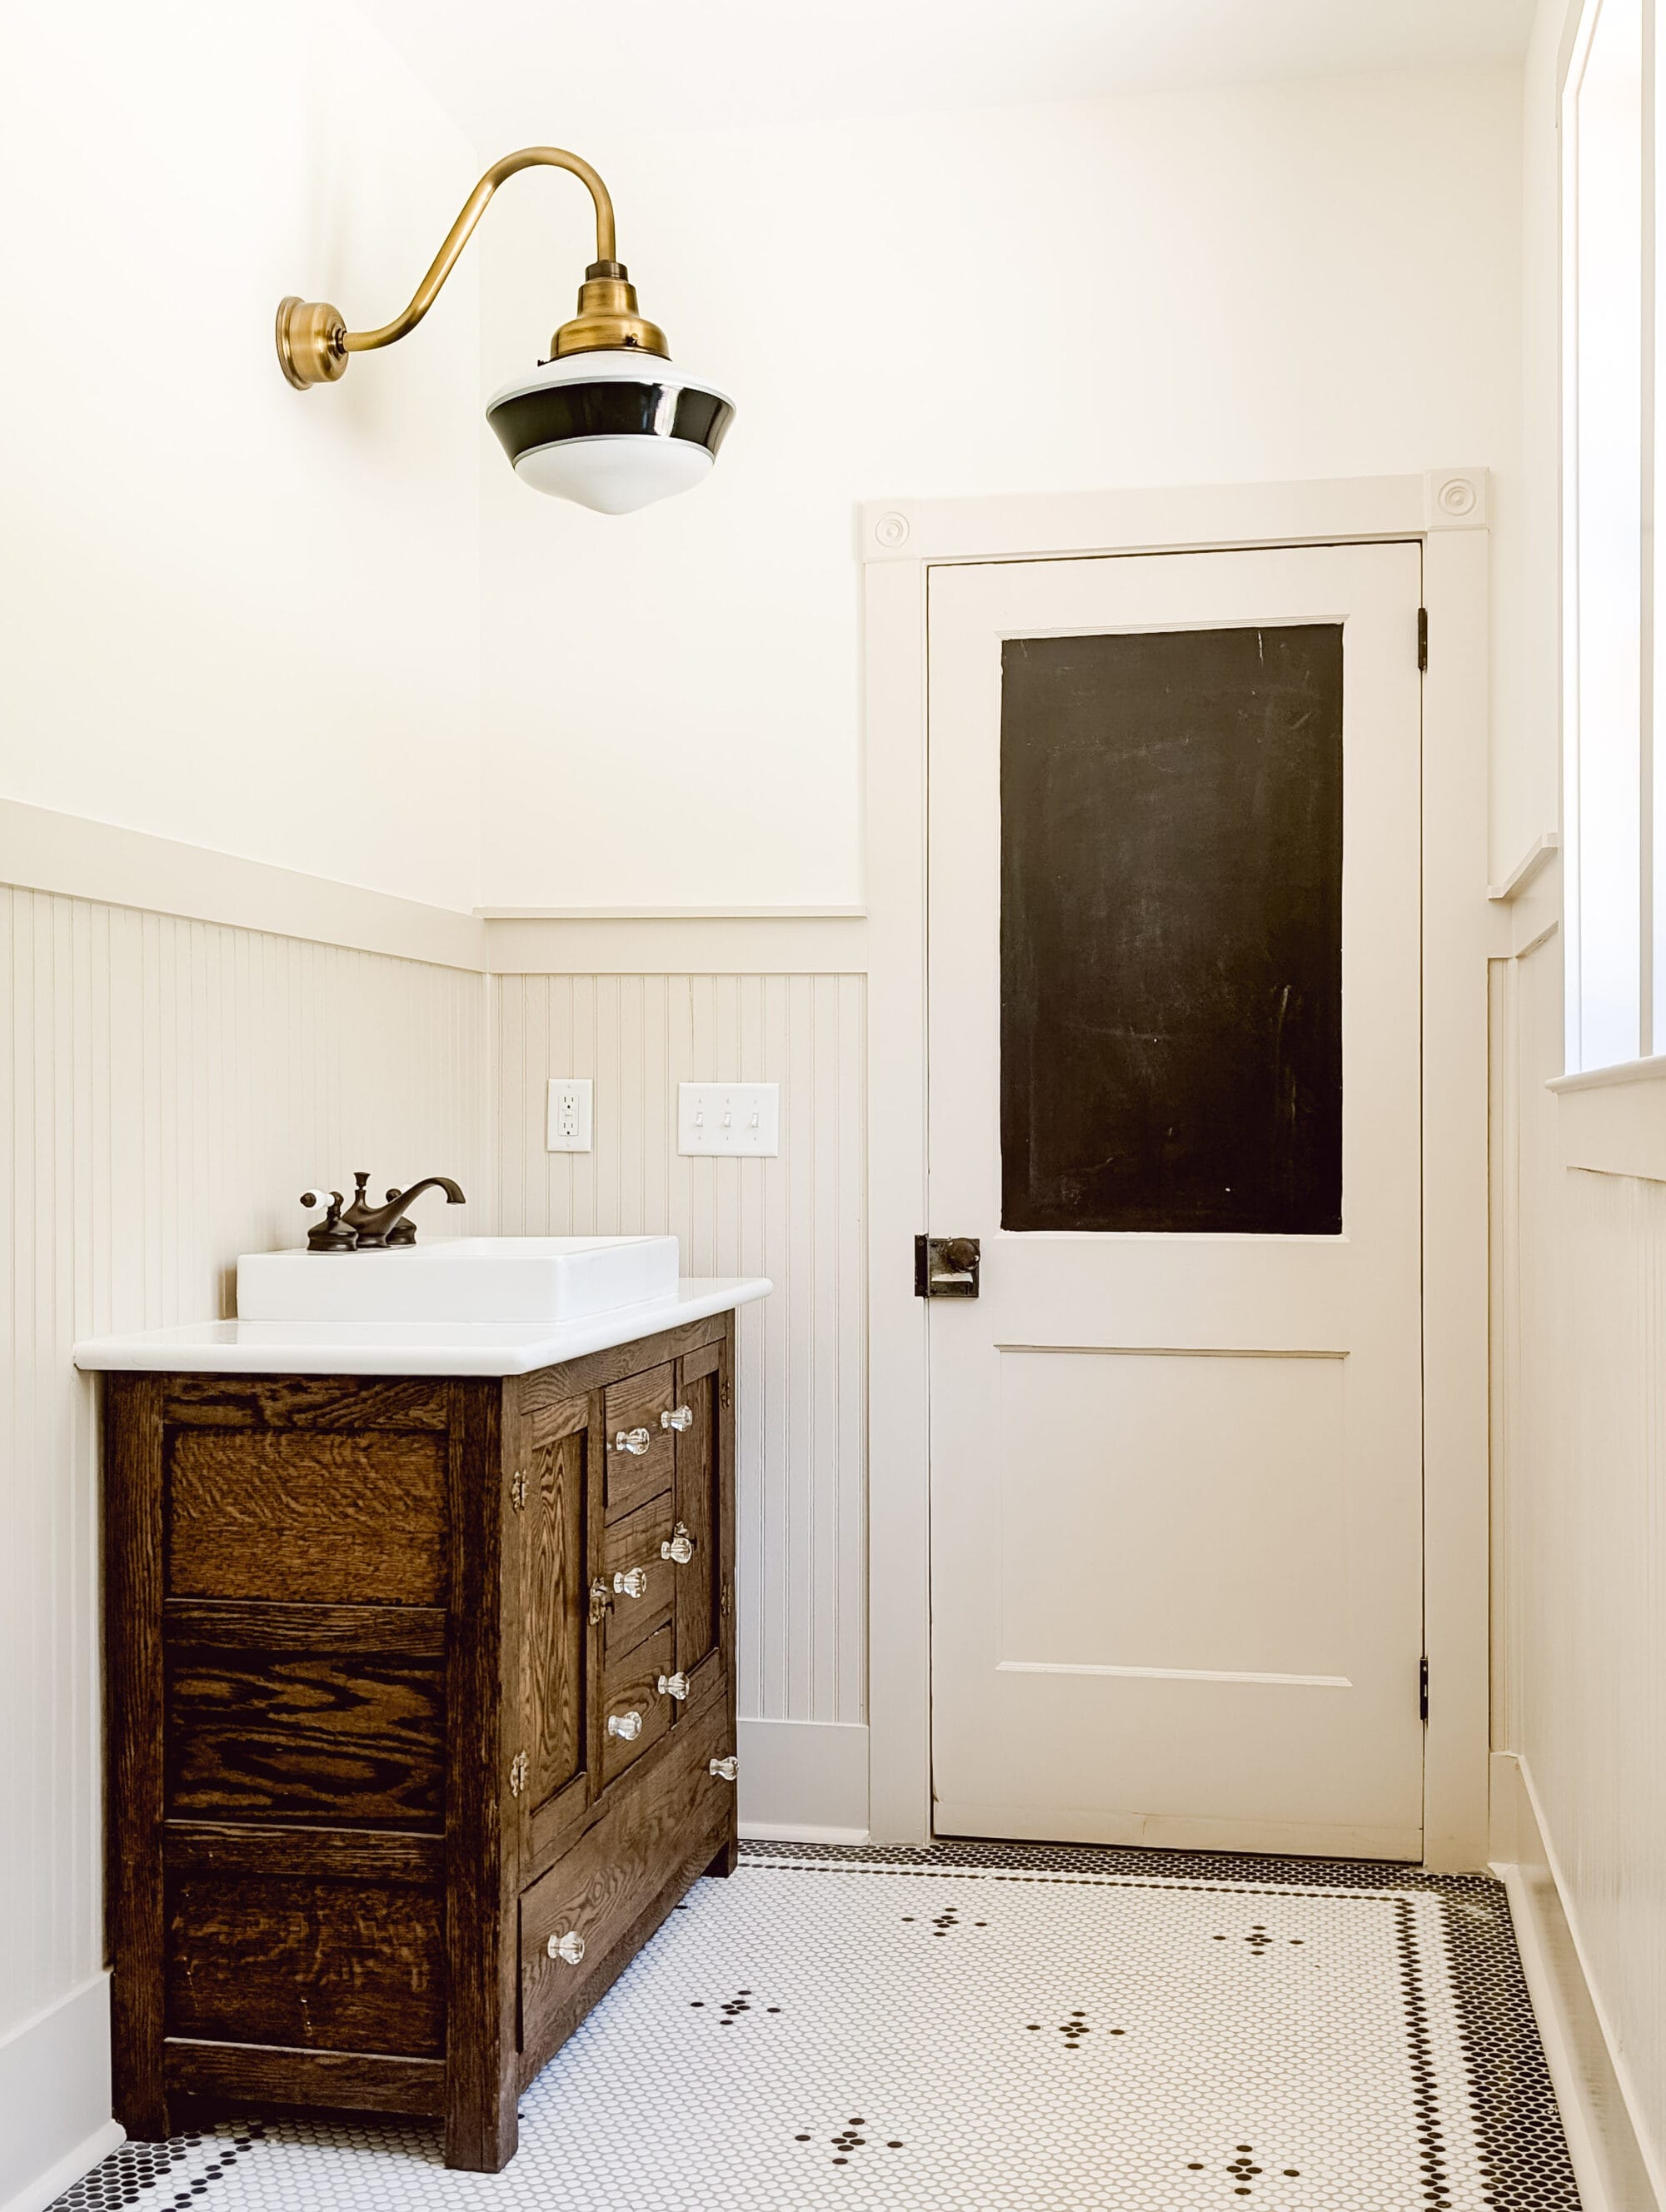
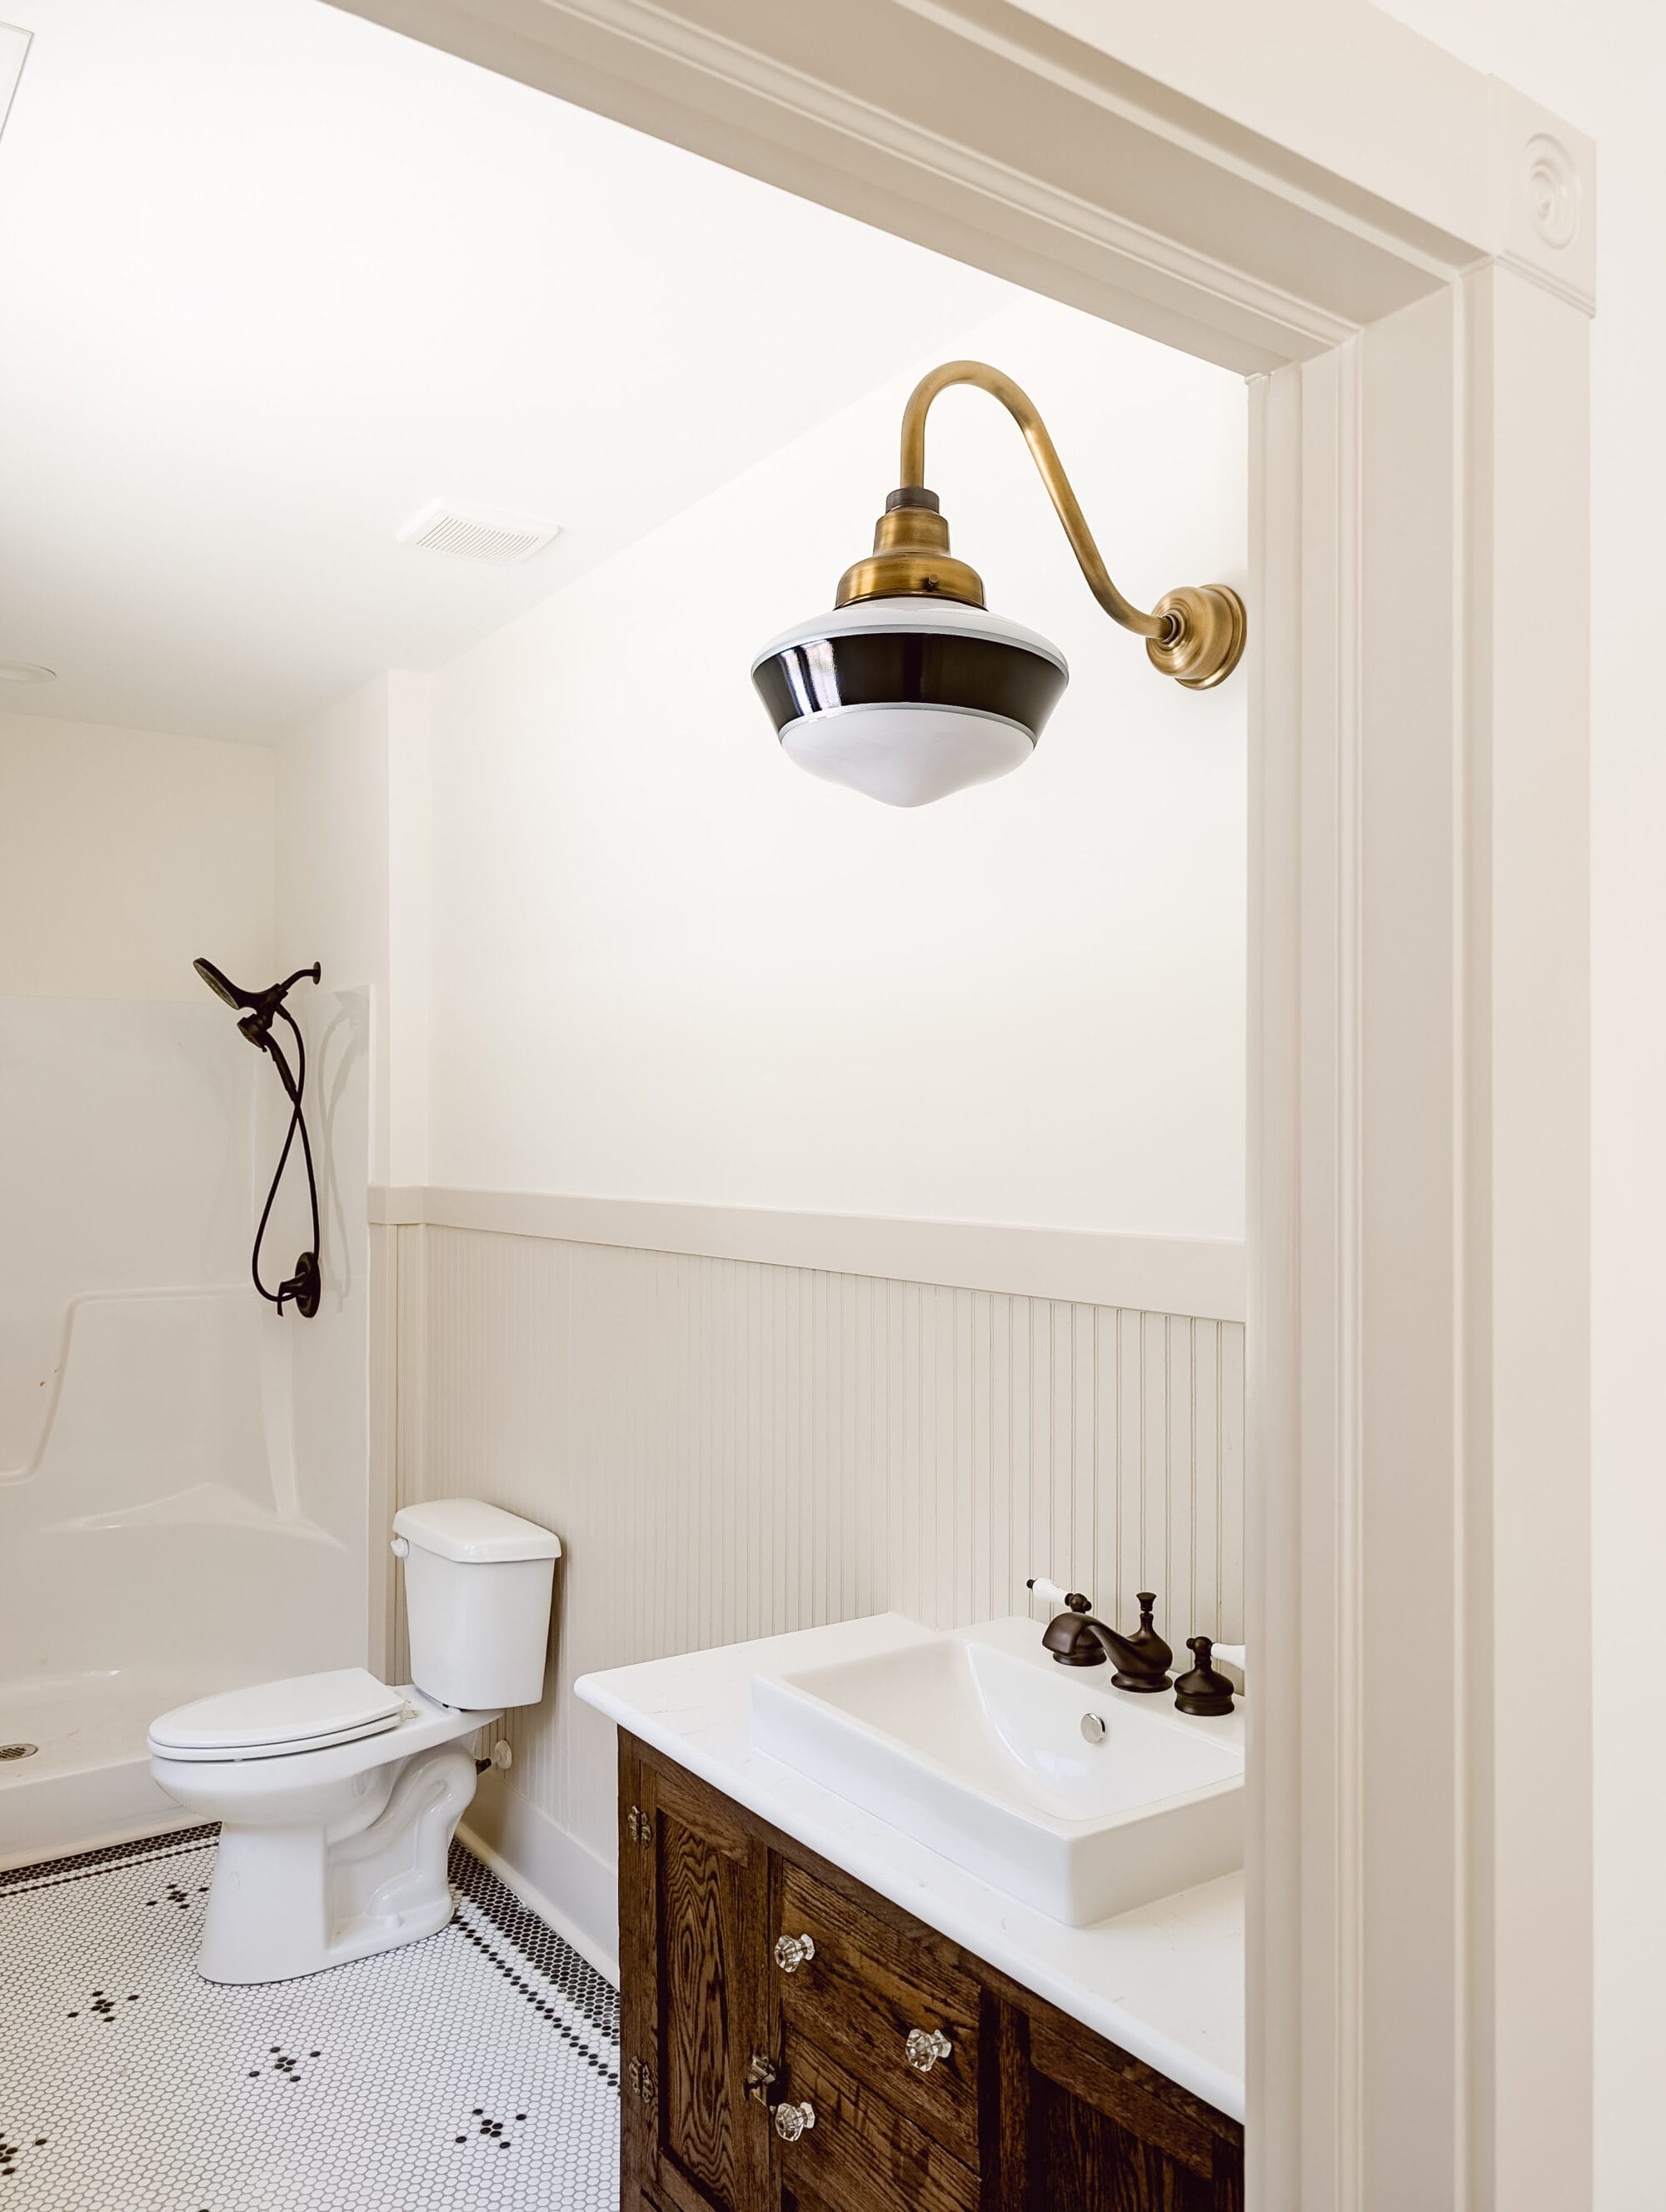
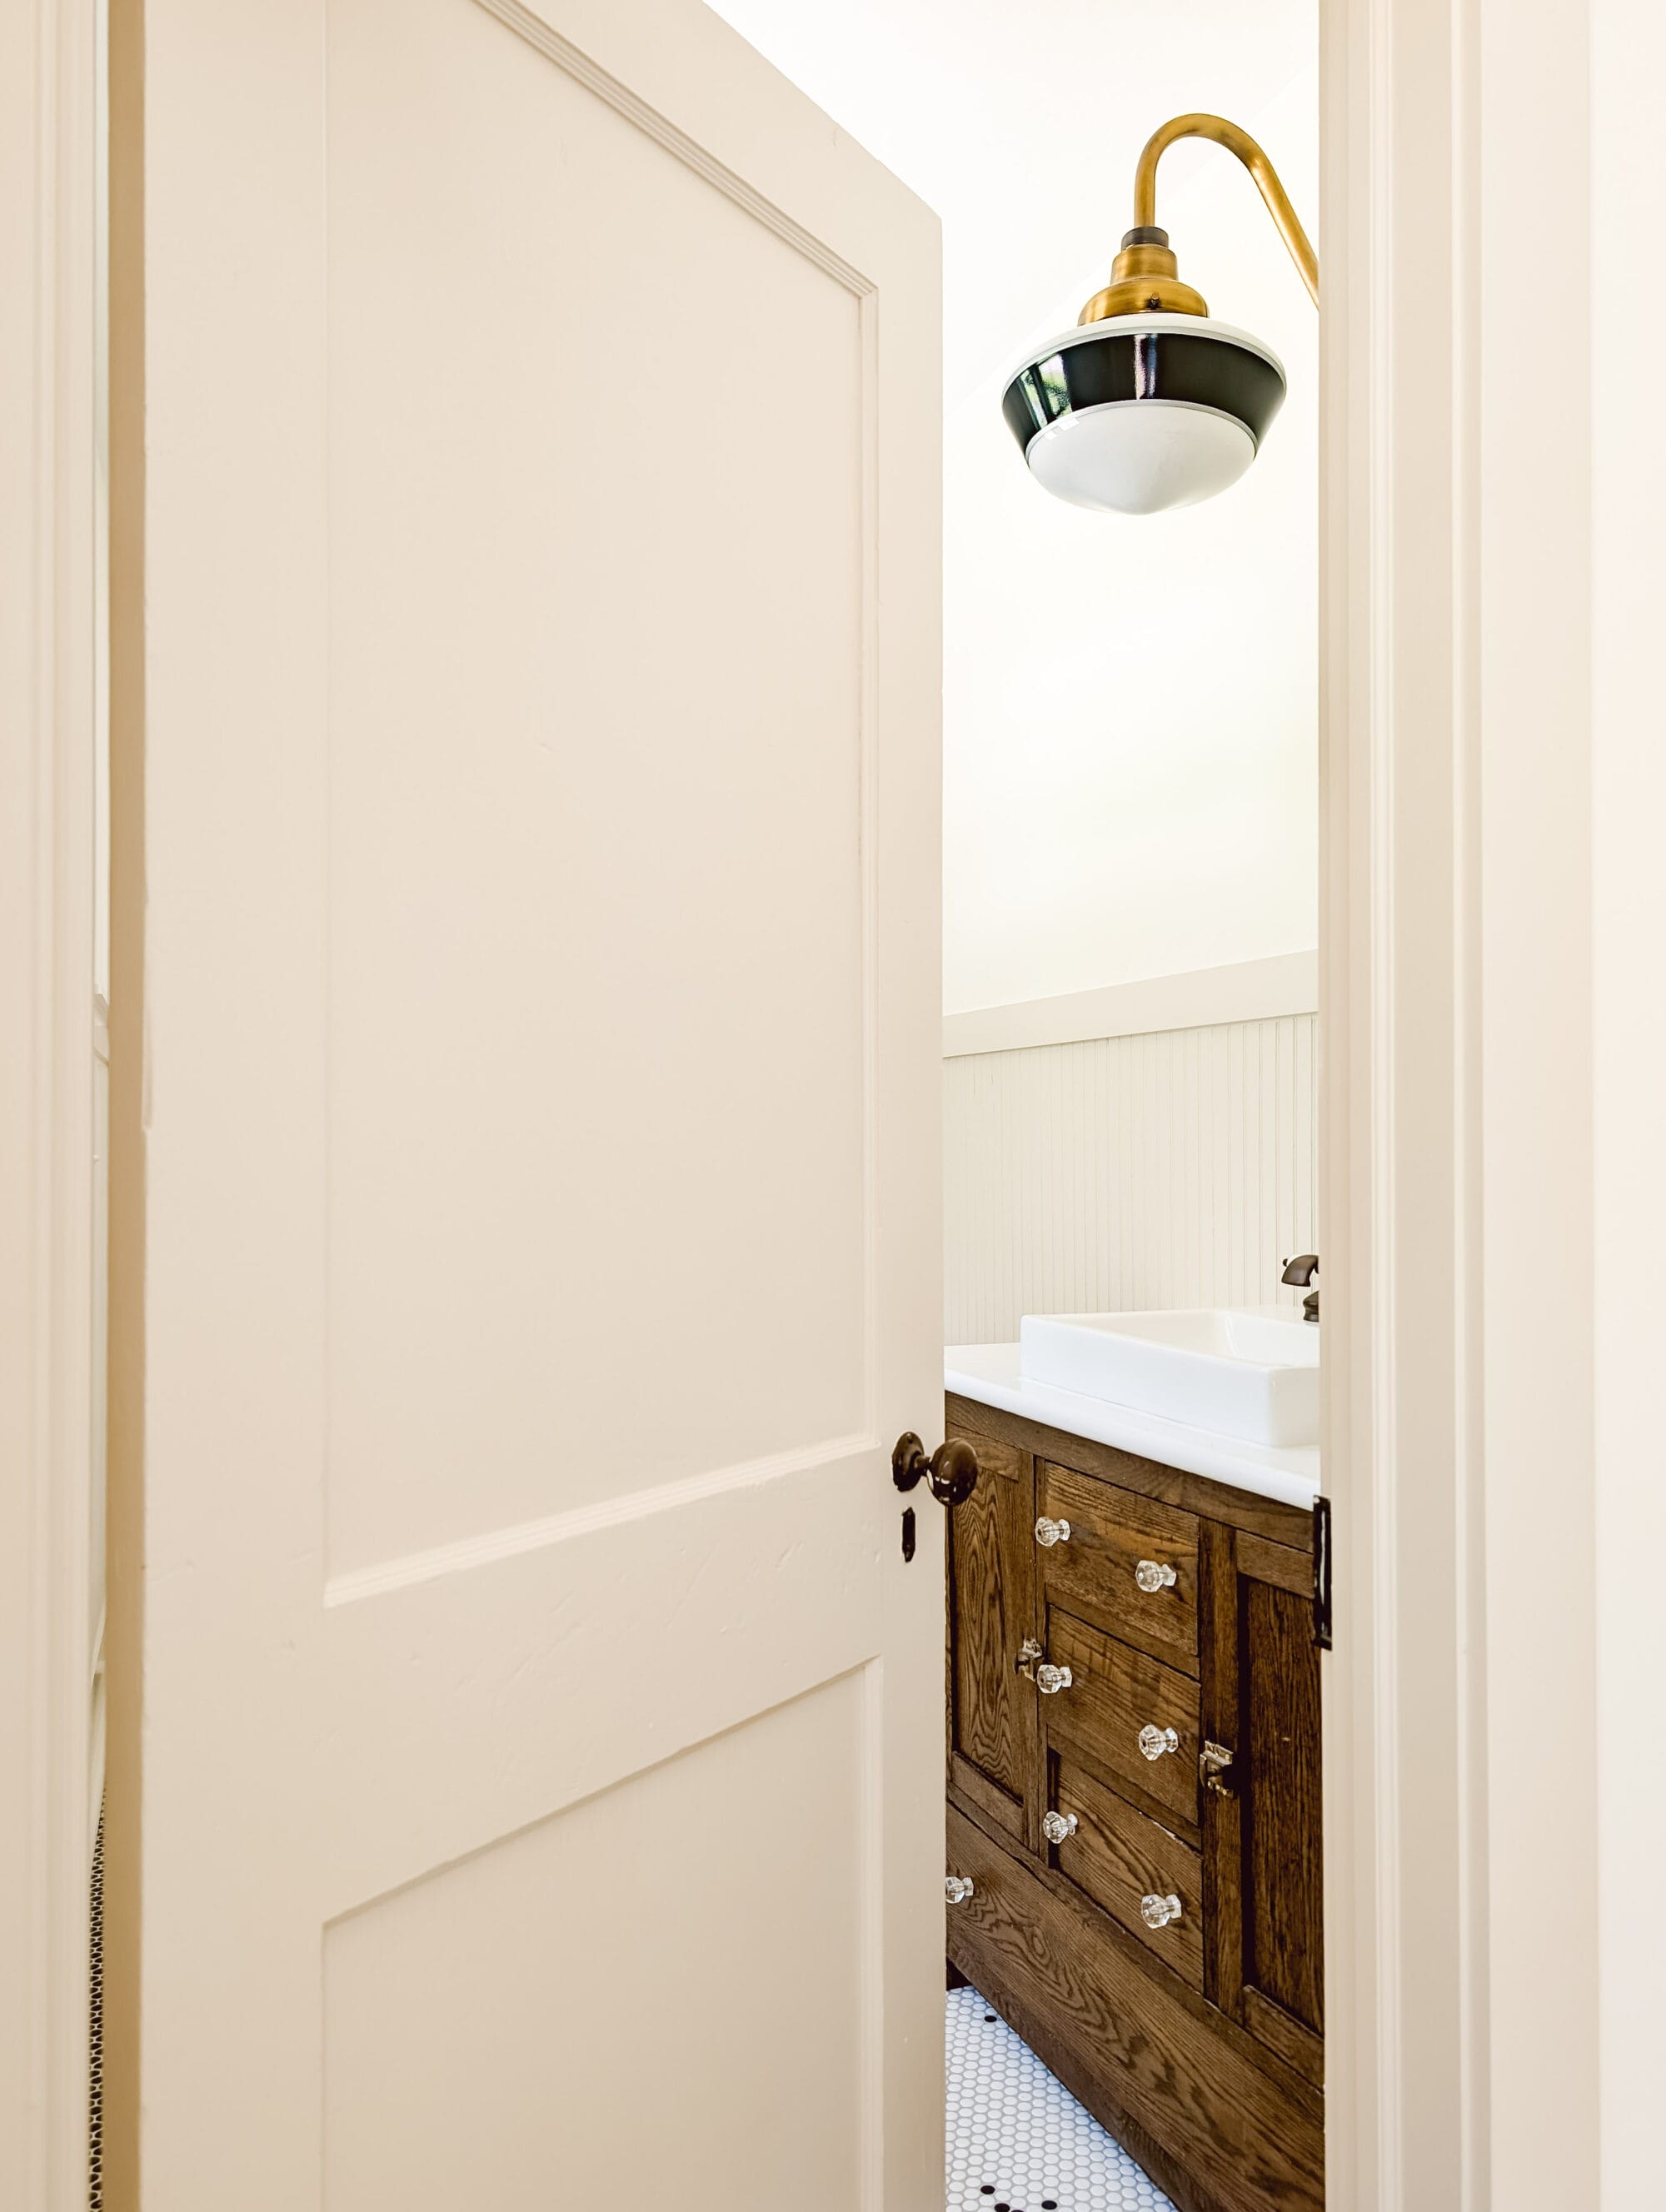
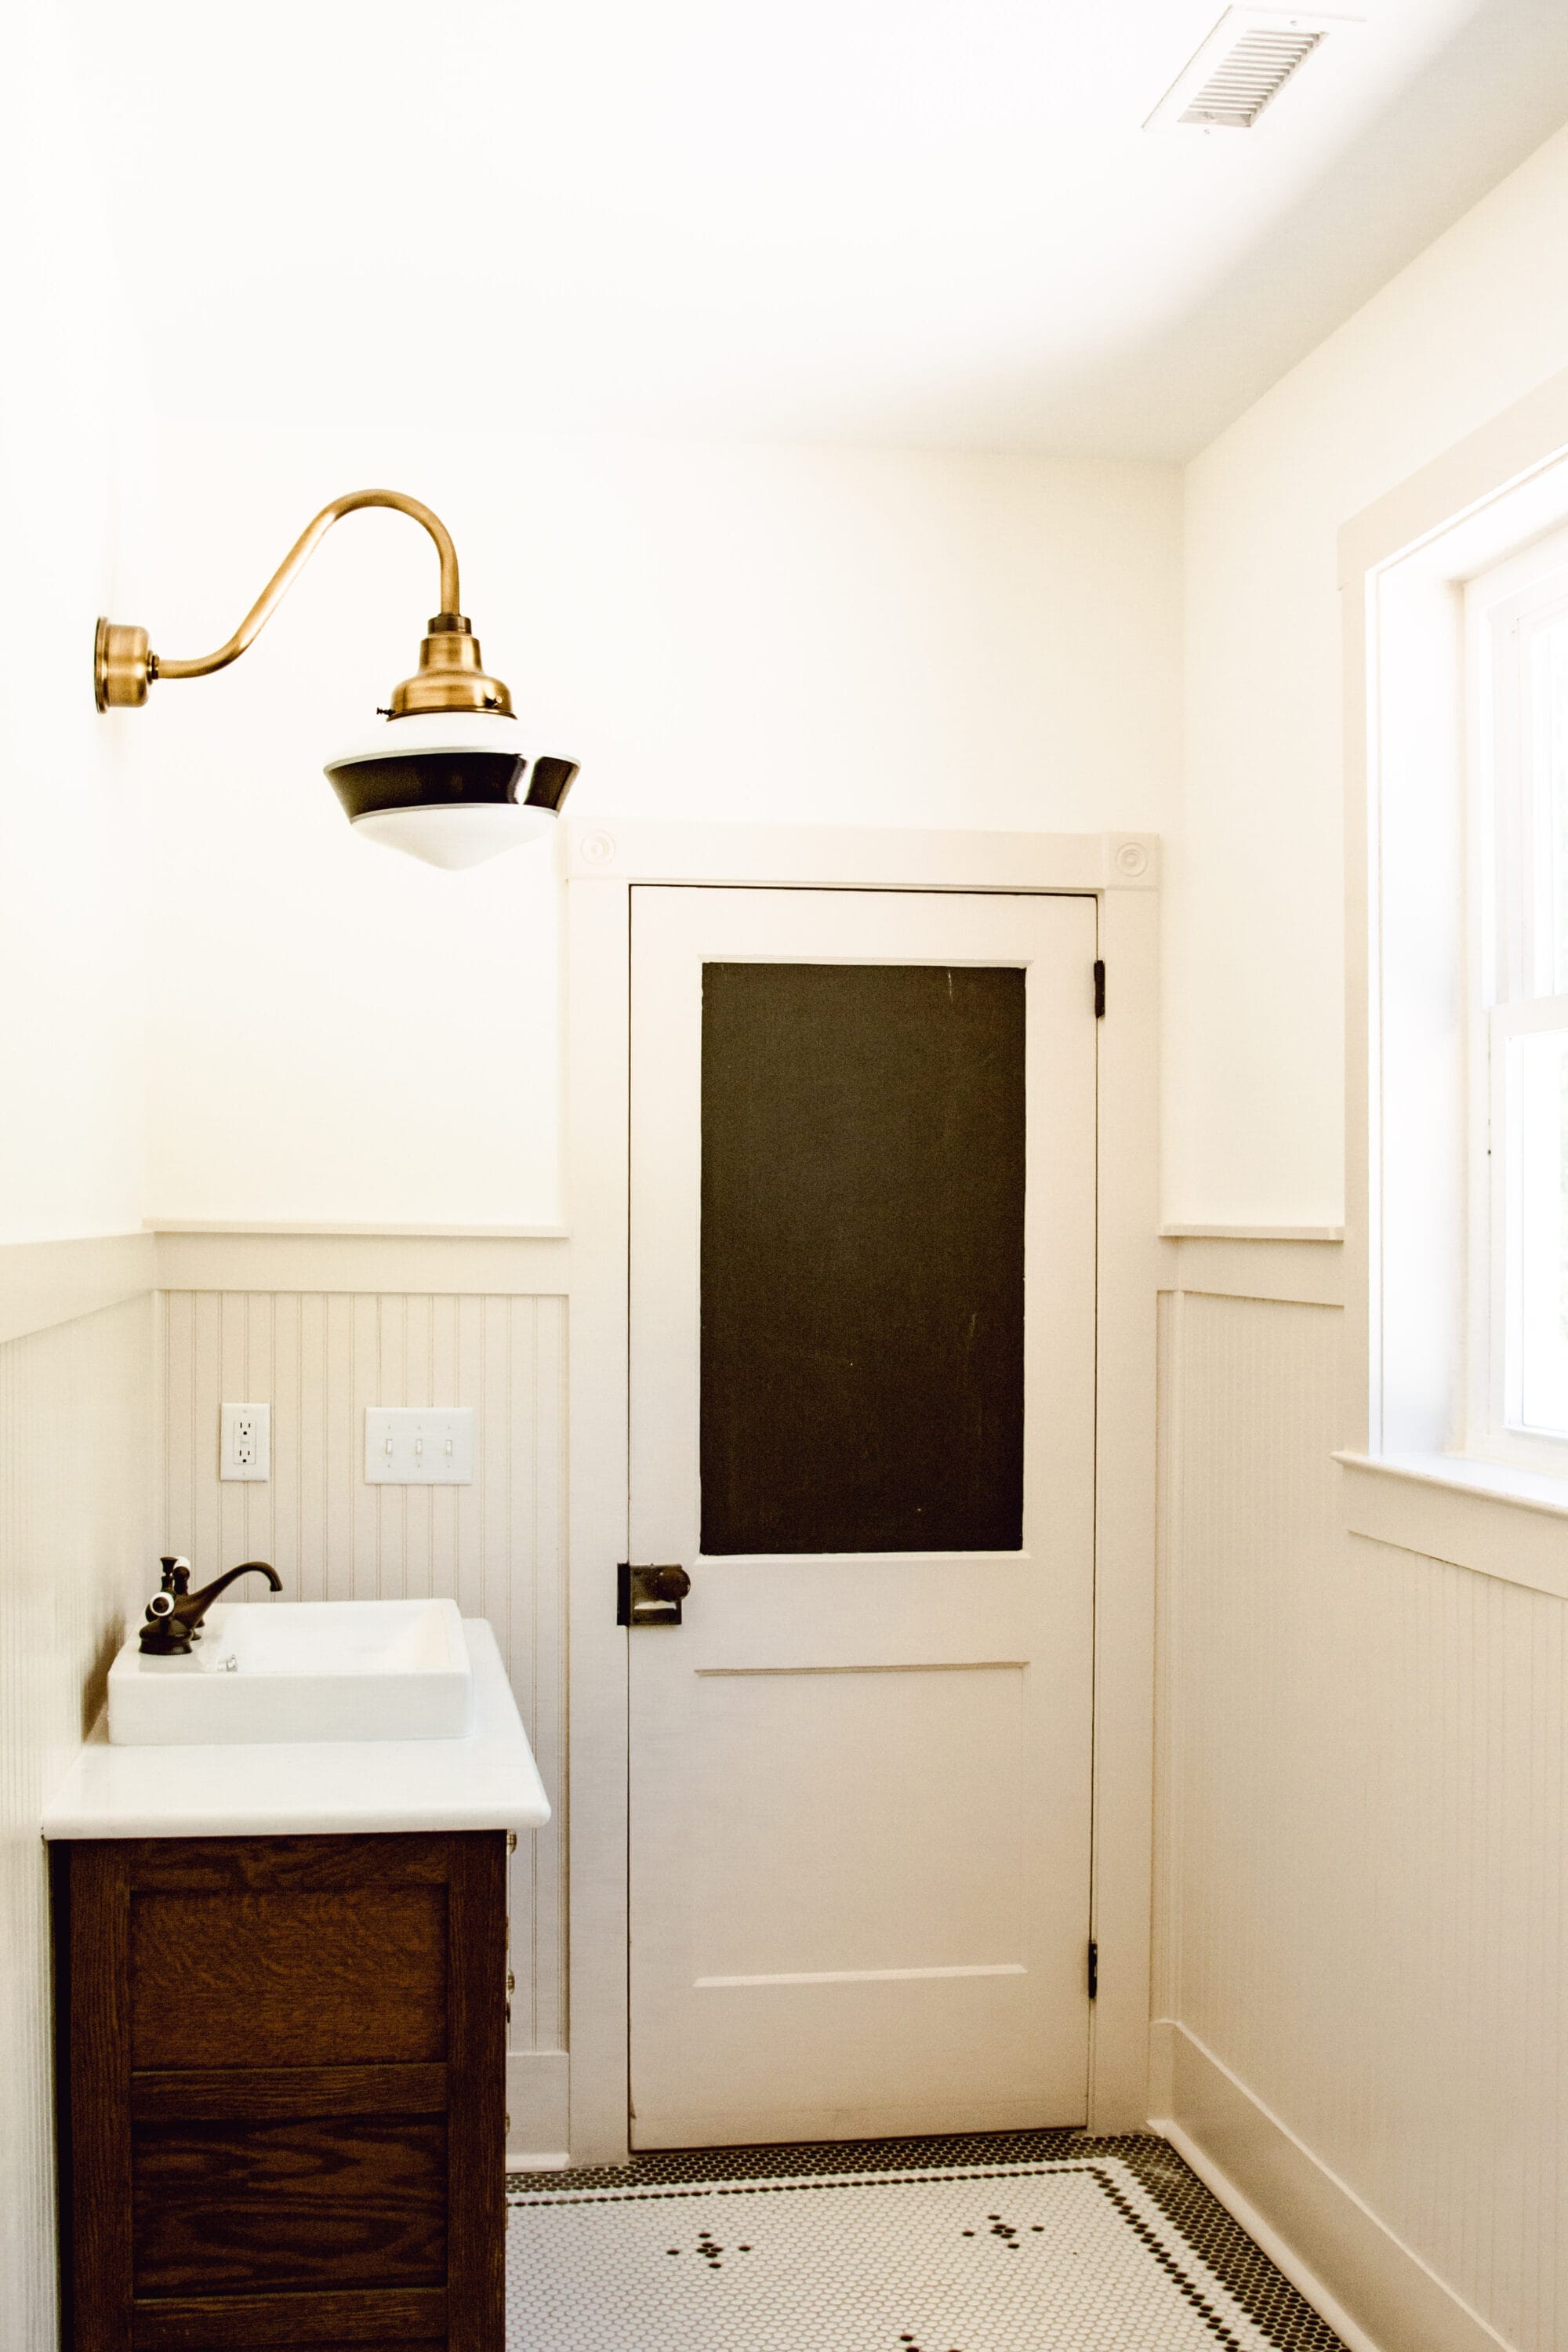
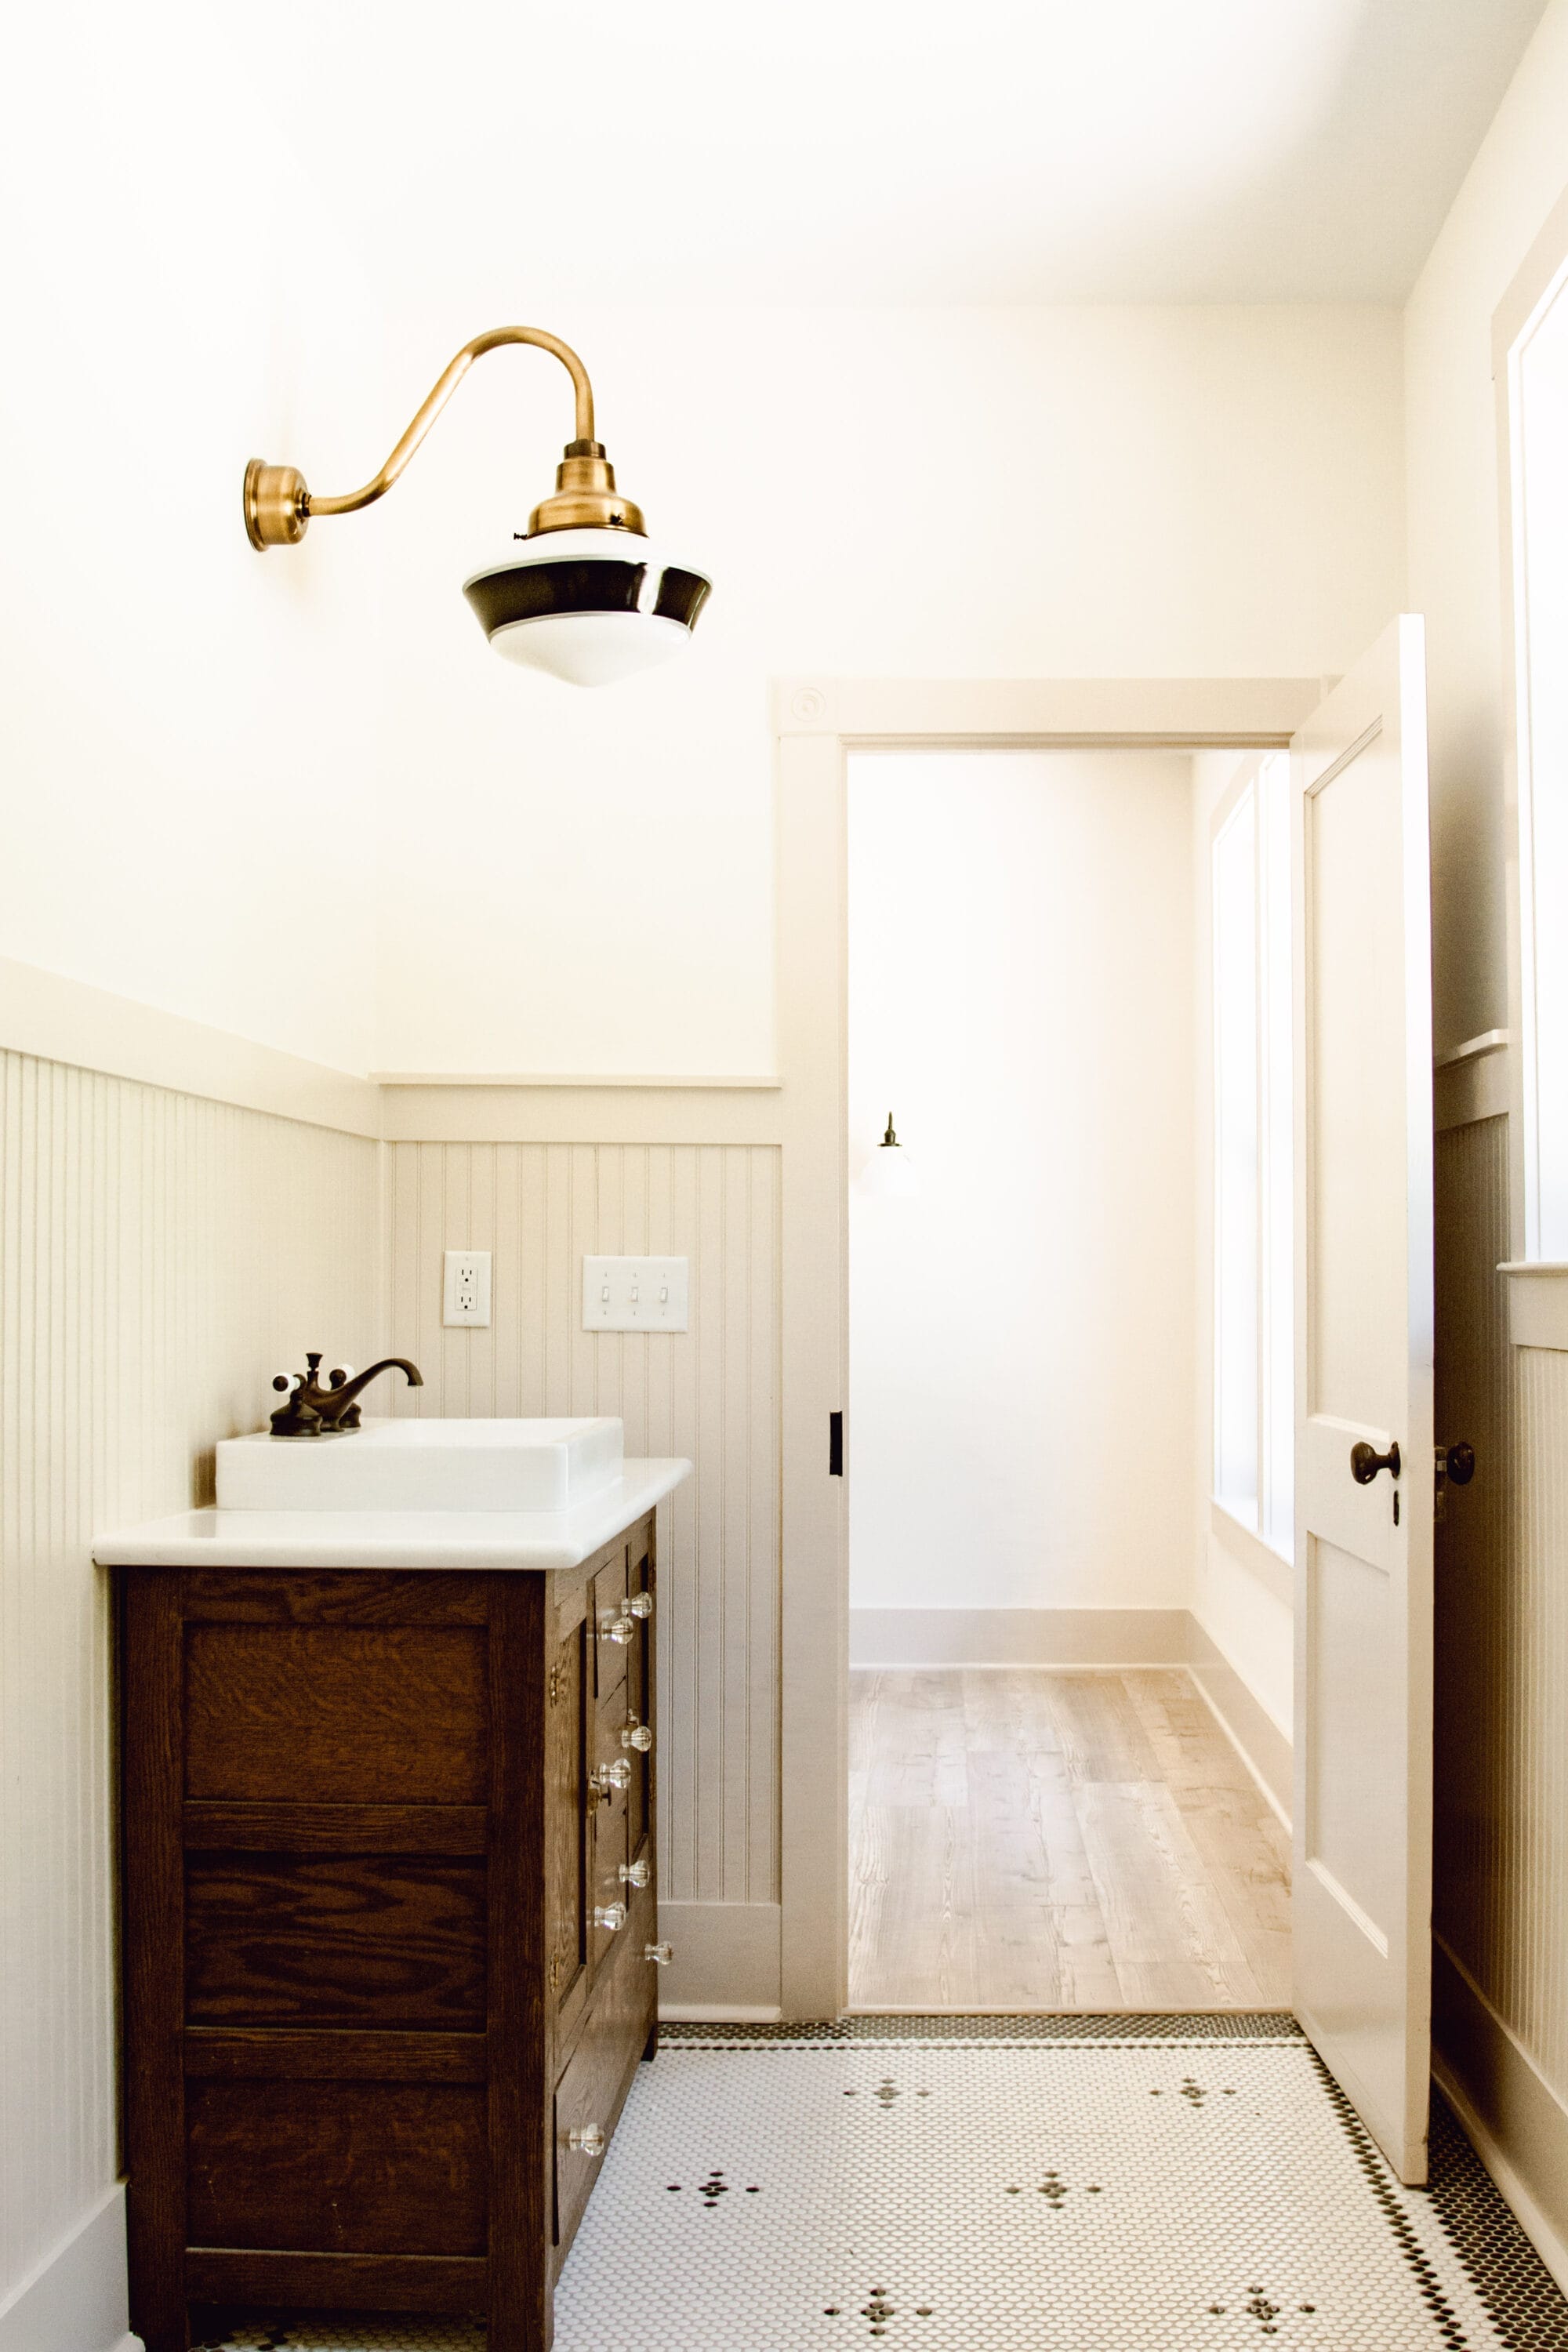
New-Old Cottage Primary Bathroom Reveal and Design Details
Since you last saw the primary bathroom, we finished the trim, I grouted all the tile, we’ve painted, installed the toilet, the vanity, and the lighting has been hung!
Let me show you what this space looks like now! Ta-da…

Don’t get me wrong – I love the cottage exterior, and the kitchen, and really the entire house. It’s all come together better than I could have imagined when we first broke ground.

But I think the primary bathroom is the room I was most excited to share with you now that construction is done!
Maybe it’s the fact that I am so proud of my tile job.
Maybe it’s because this space feels so true to my style and what I love.
All I know is this bathroom is one of my favorite rooms in the cottage!
Ain’t it purdy?!
Let’s chat through some of the primary bath design details while I share the rest of the photos of this space!
Vintage-Inspired Lighting from Barn Light Electric
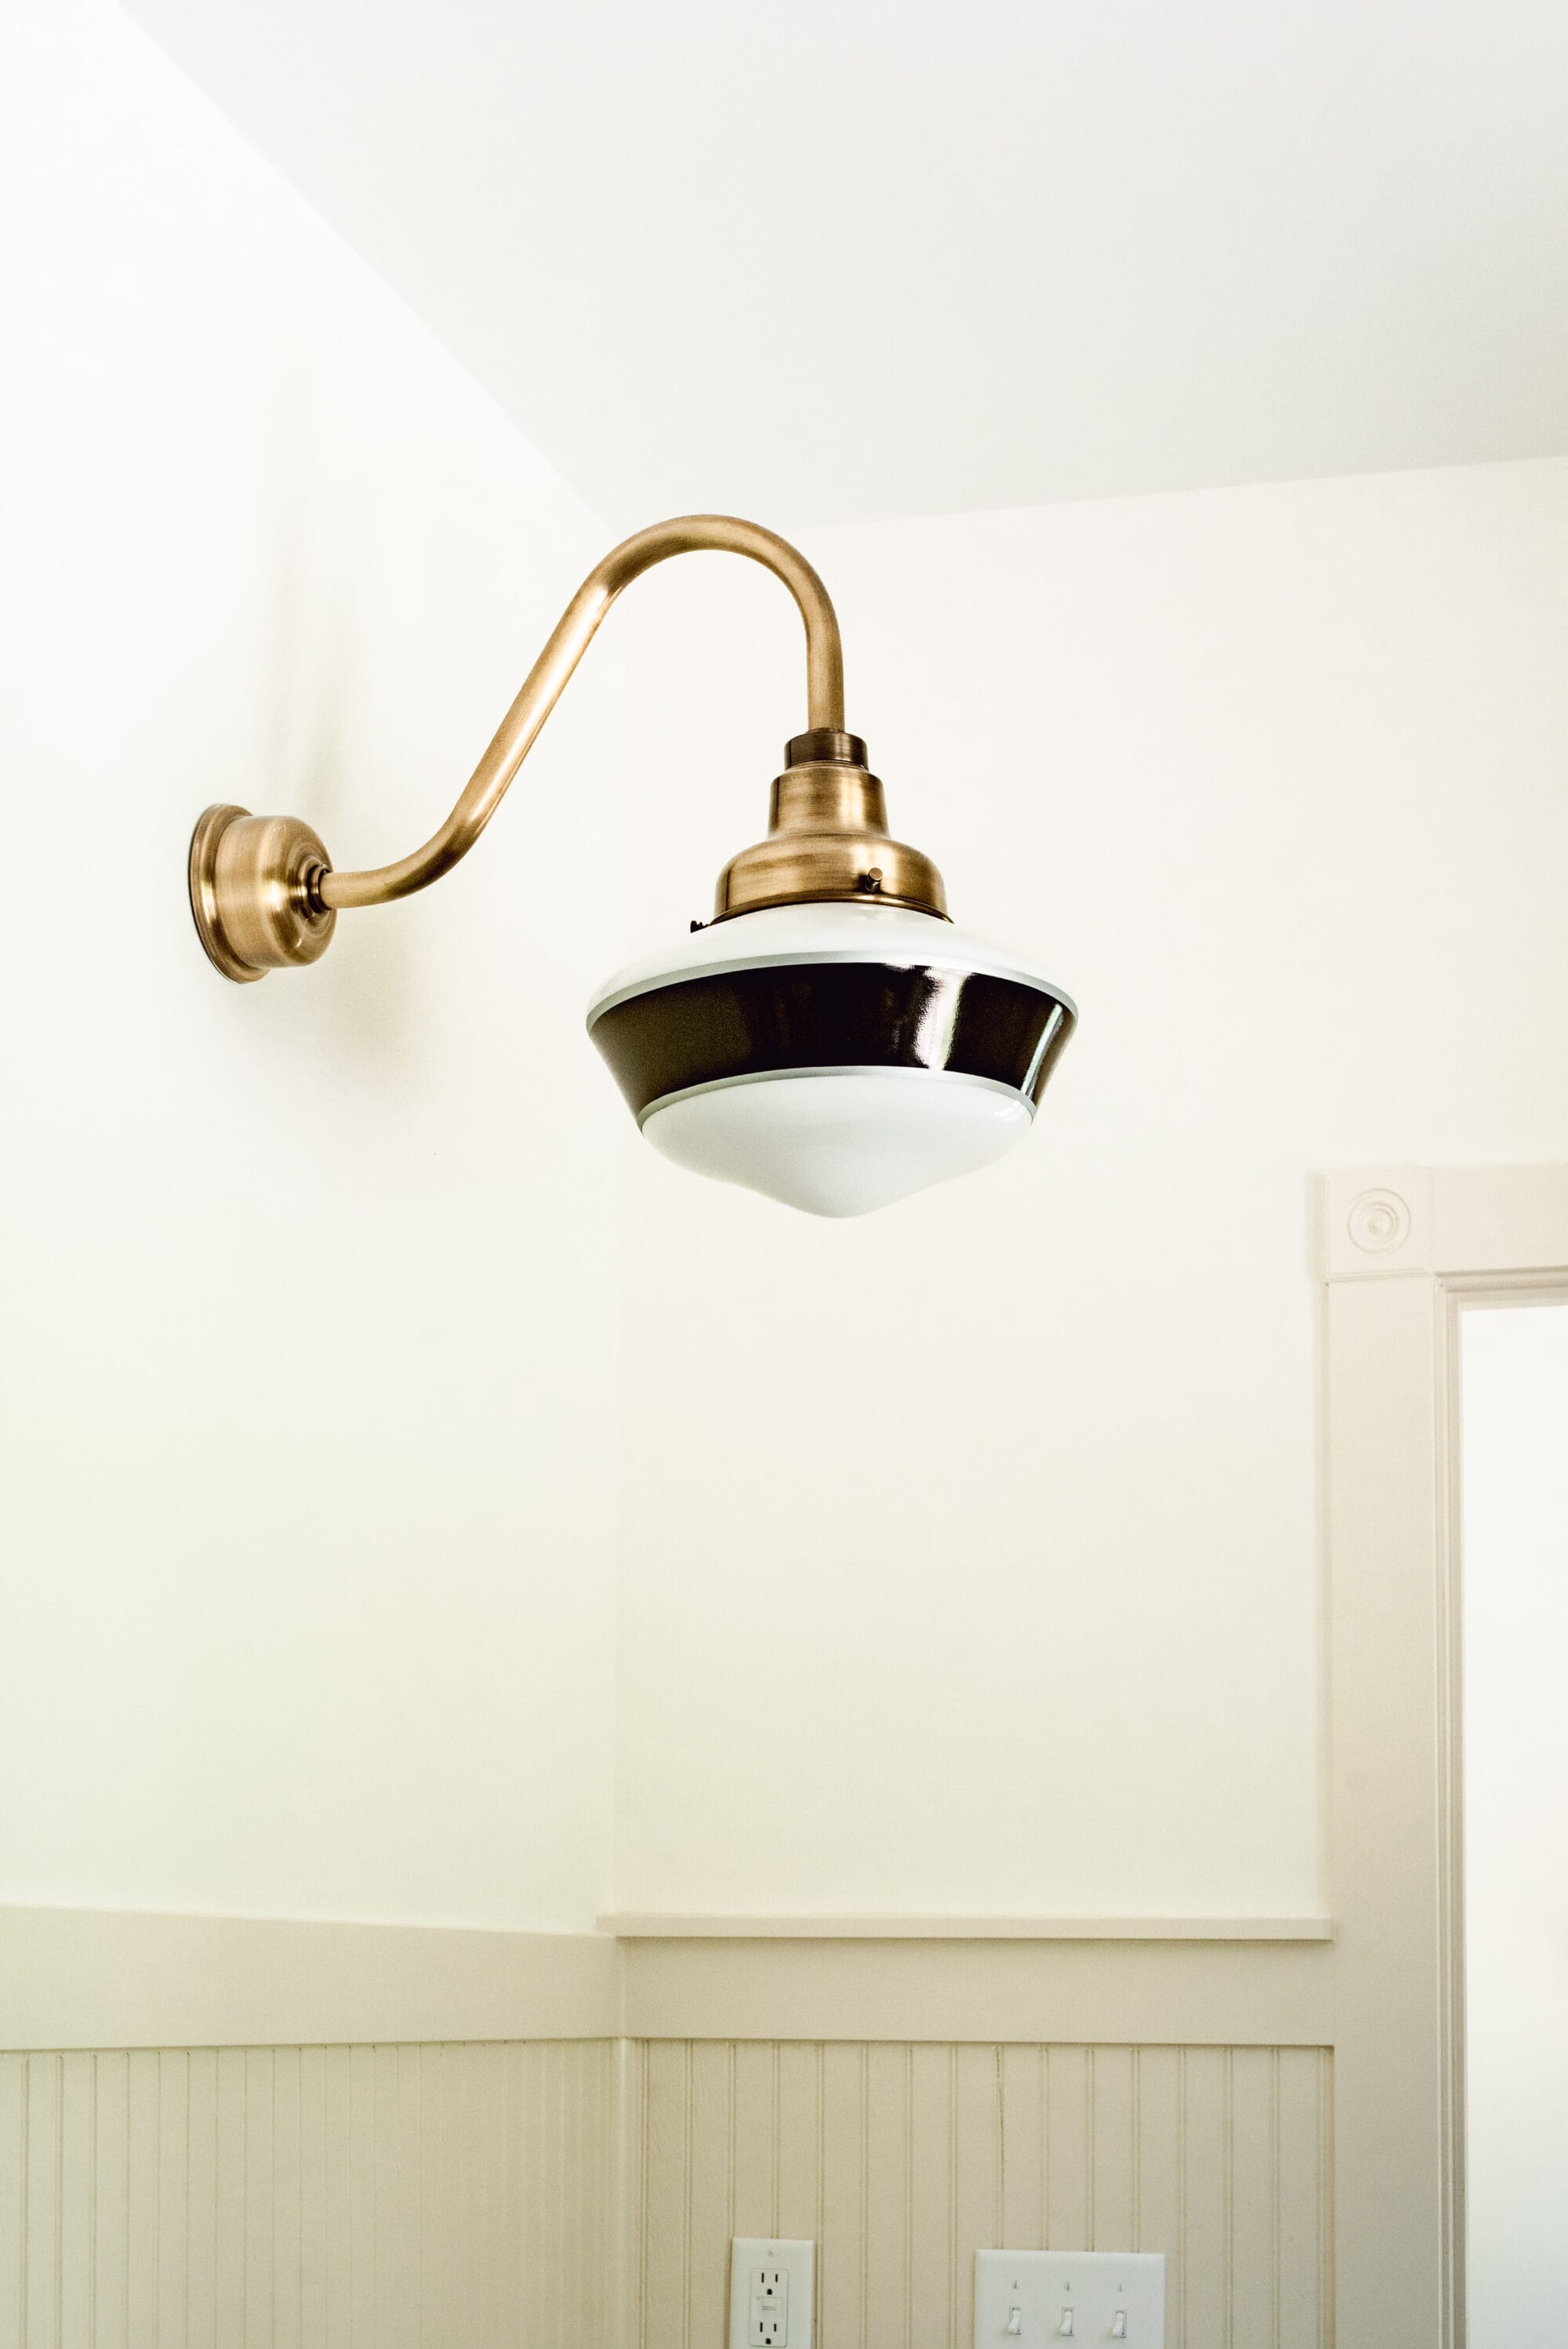
We’ll start with the vanity light…

We chose this Primary Schoolhouse Gooseneck Light for the primary bathroom and it is absolutely STUNNING in person!
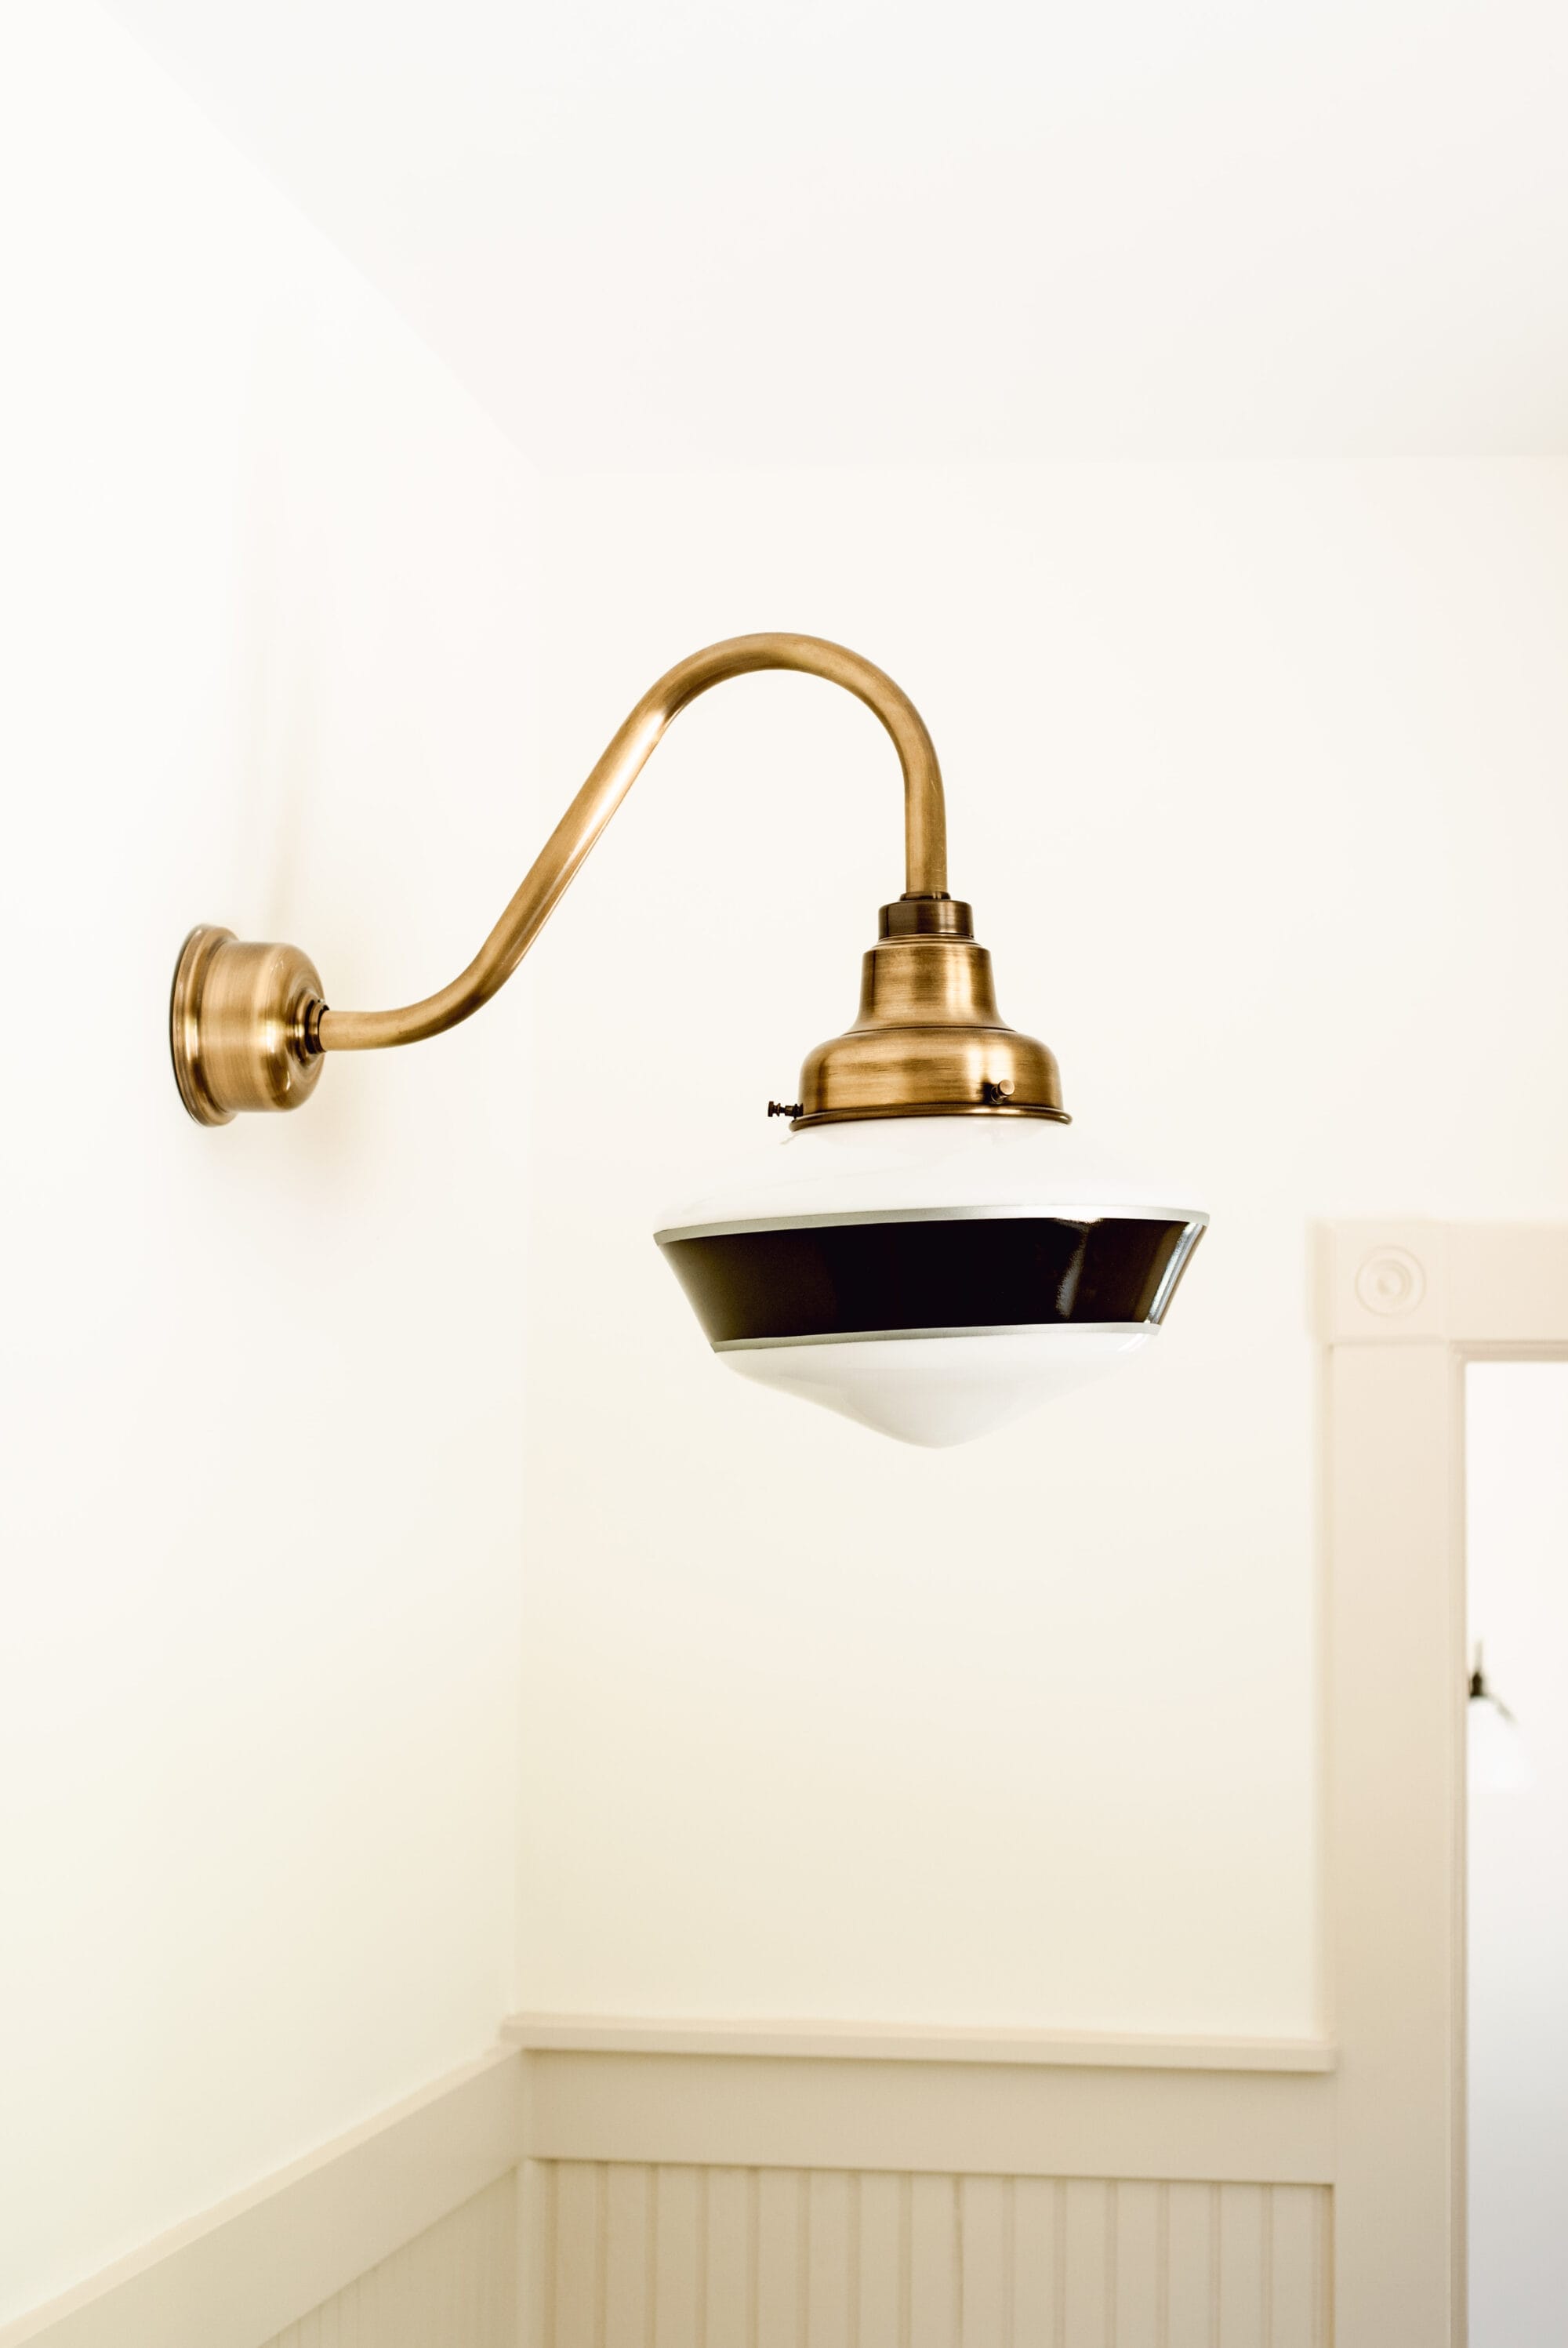
The antique brass gooseneck arm ties in to the original brass latches on the vanity cabinet doors.
And the black painted stripe on the schoolhouse globe is the perfect compliment to the black and white tile floor…

…and the black chalkboard painted area on the back of the bathroom door.

I can’t get over how pretty it is and how much I love the black / white / brass combo together in here.

This schoolhouse light is one of my favorite lights in the cottage because it just has such a classic feel to it. It looks like it was made for this bathroom!
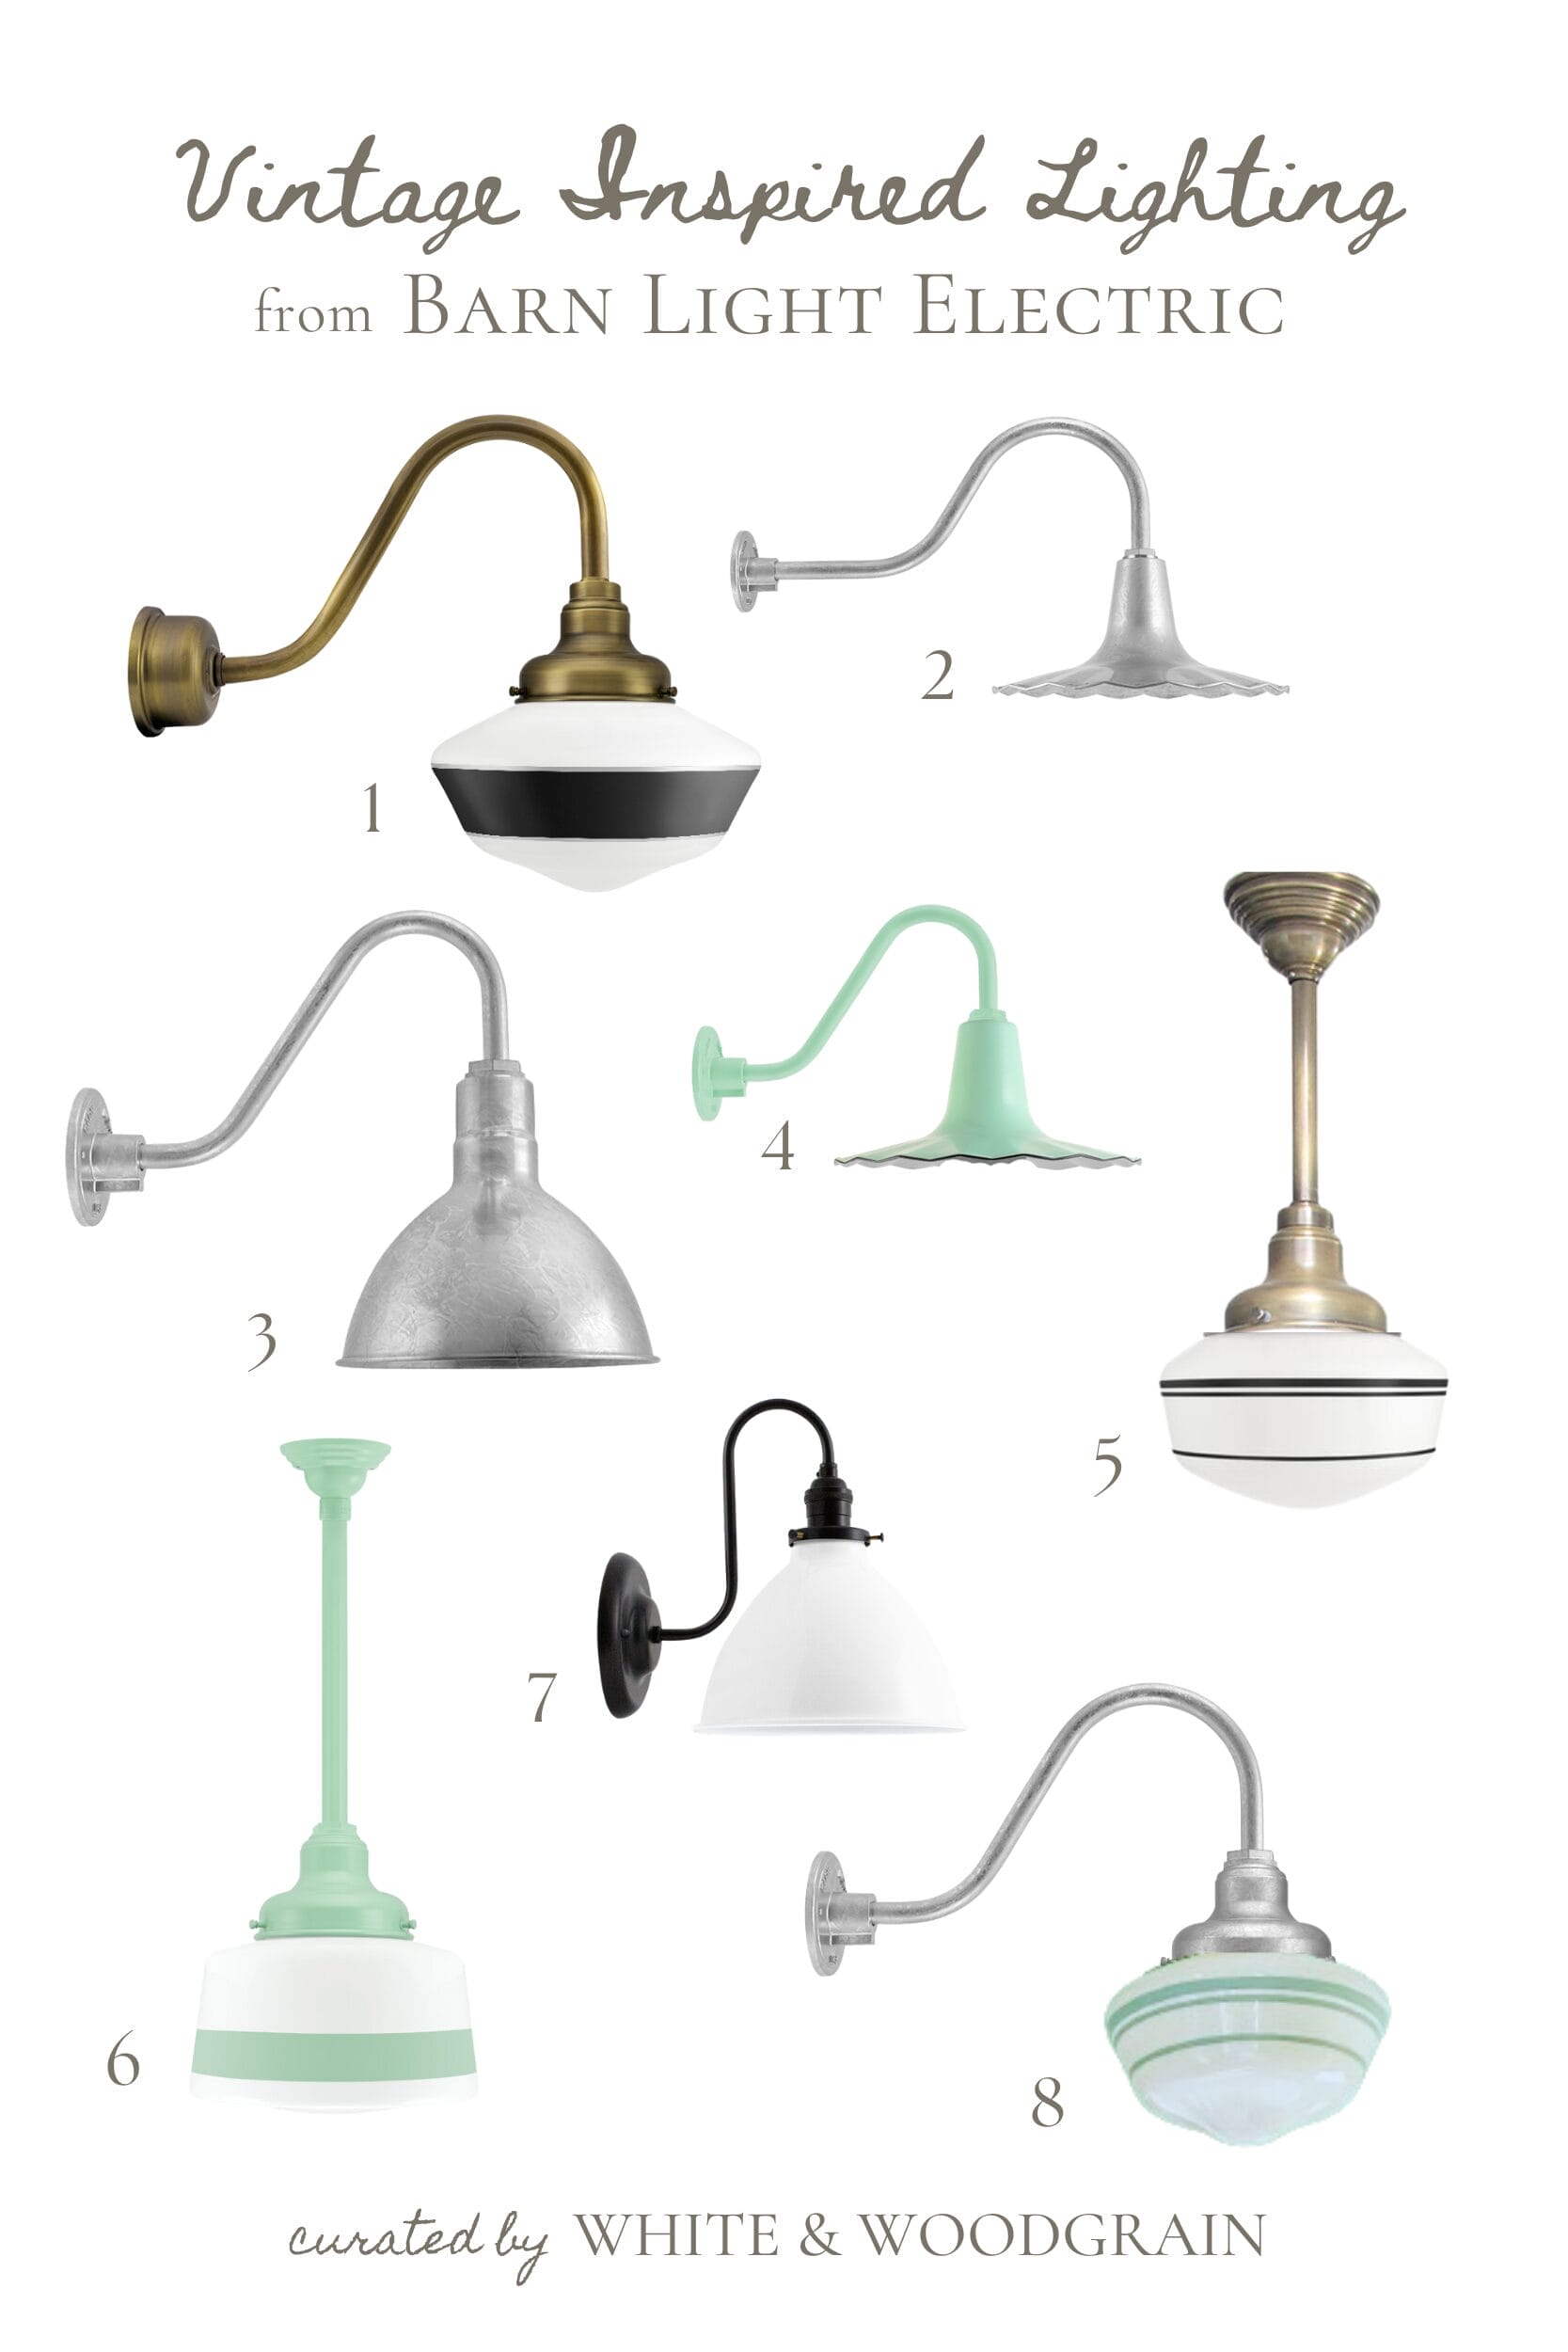
If you loved the light fixture we chose for the primary bathroom, I know you’ll love the rest of the cottage lights too! So I’ll link them all below for you to see.

Click any of the links below to shop our vintage-inspired lighting from Barn Light Electric.
The Cottage Lighting
8
Primary Schoolhouse Gooseneck
An Antique Buffet / Bathroom Vanity
Let’s chat about the vanity next.
We found this antique buffet at the Burgaw Antiqueplace, which happens to be one of my favorite local antique shops!

I LOVE this piece as a bathroom vanity! What do you think of it?

It just happened to be the right height, and the right size to be converted into a bathroom vanity.
We removed the old wood top, (don’t worry, we have an idea in mind for the original buffet top) and added a quarts countertop and a vessel sink to finish it off.
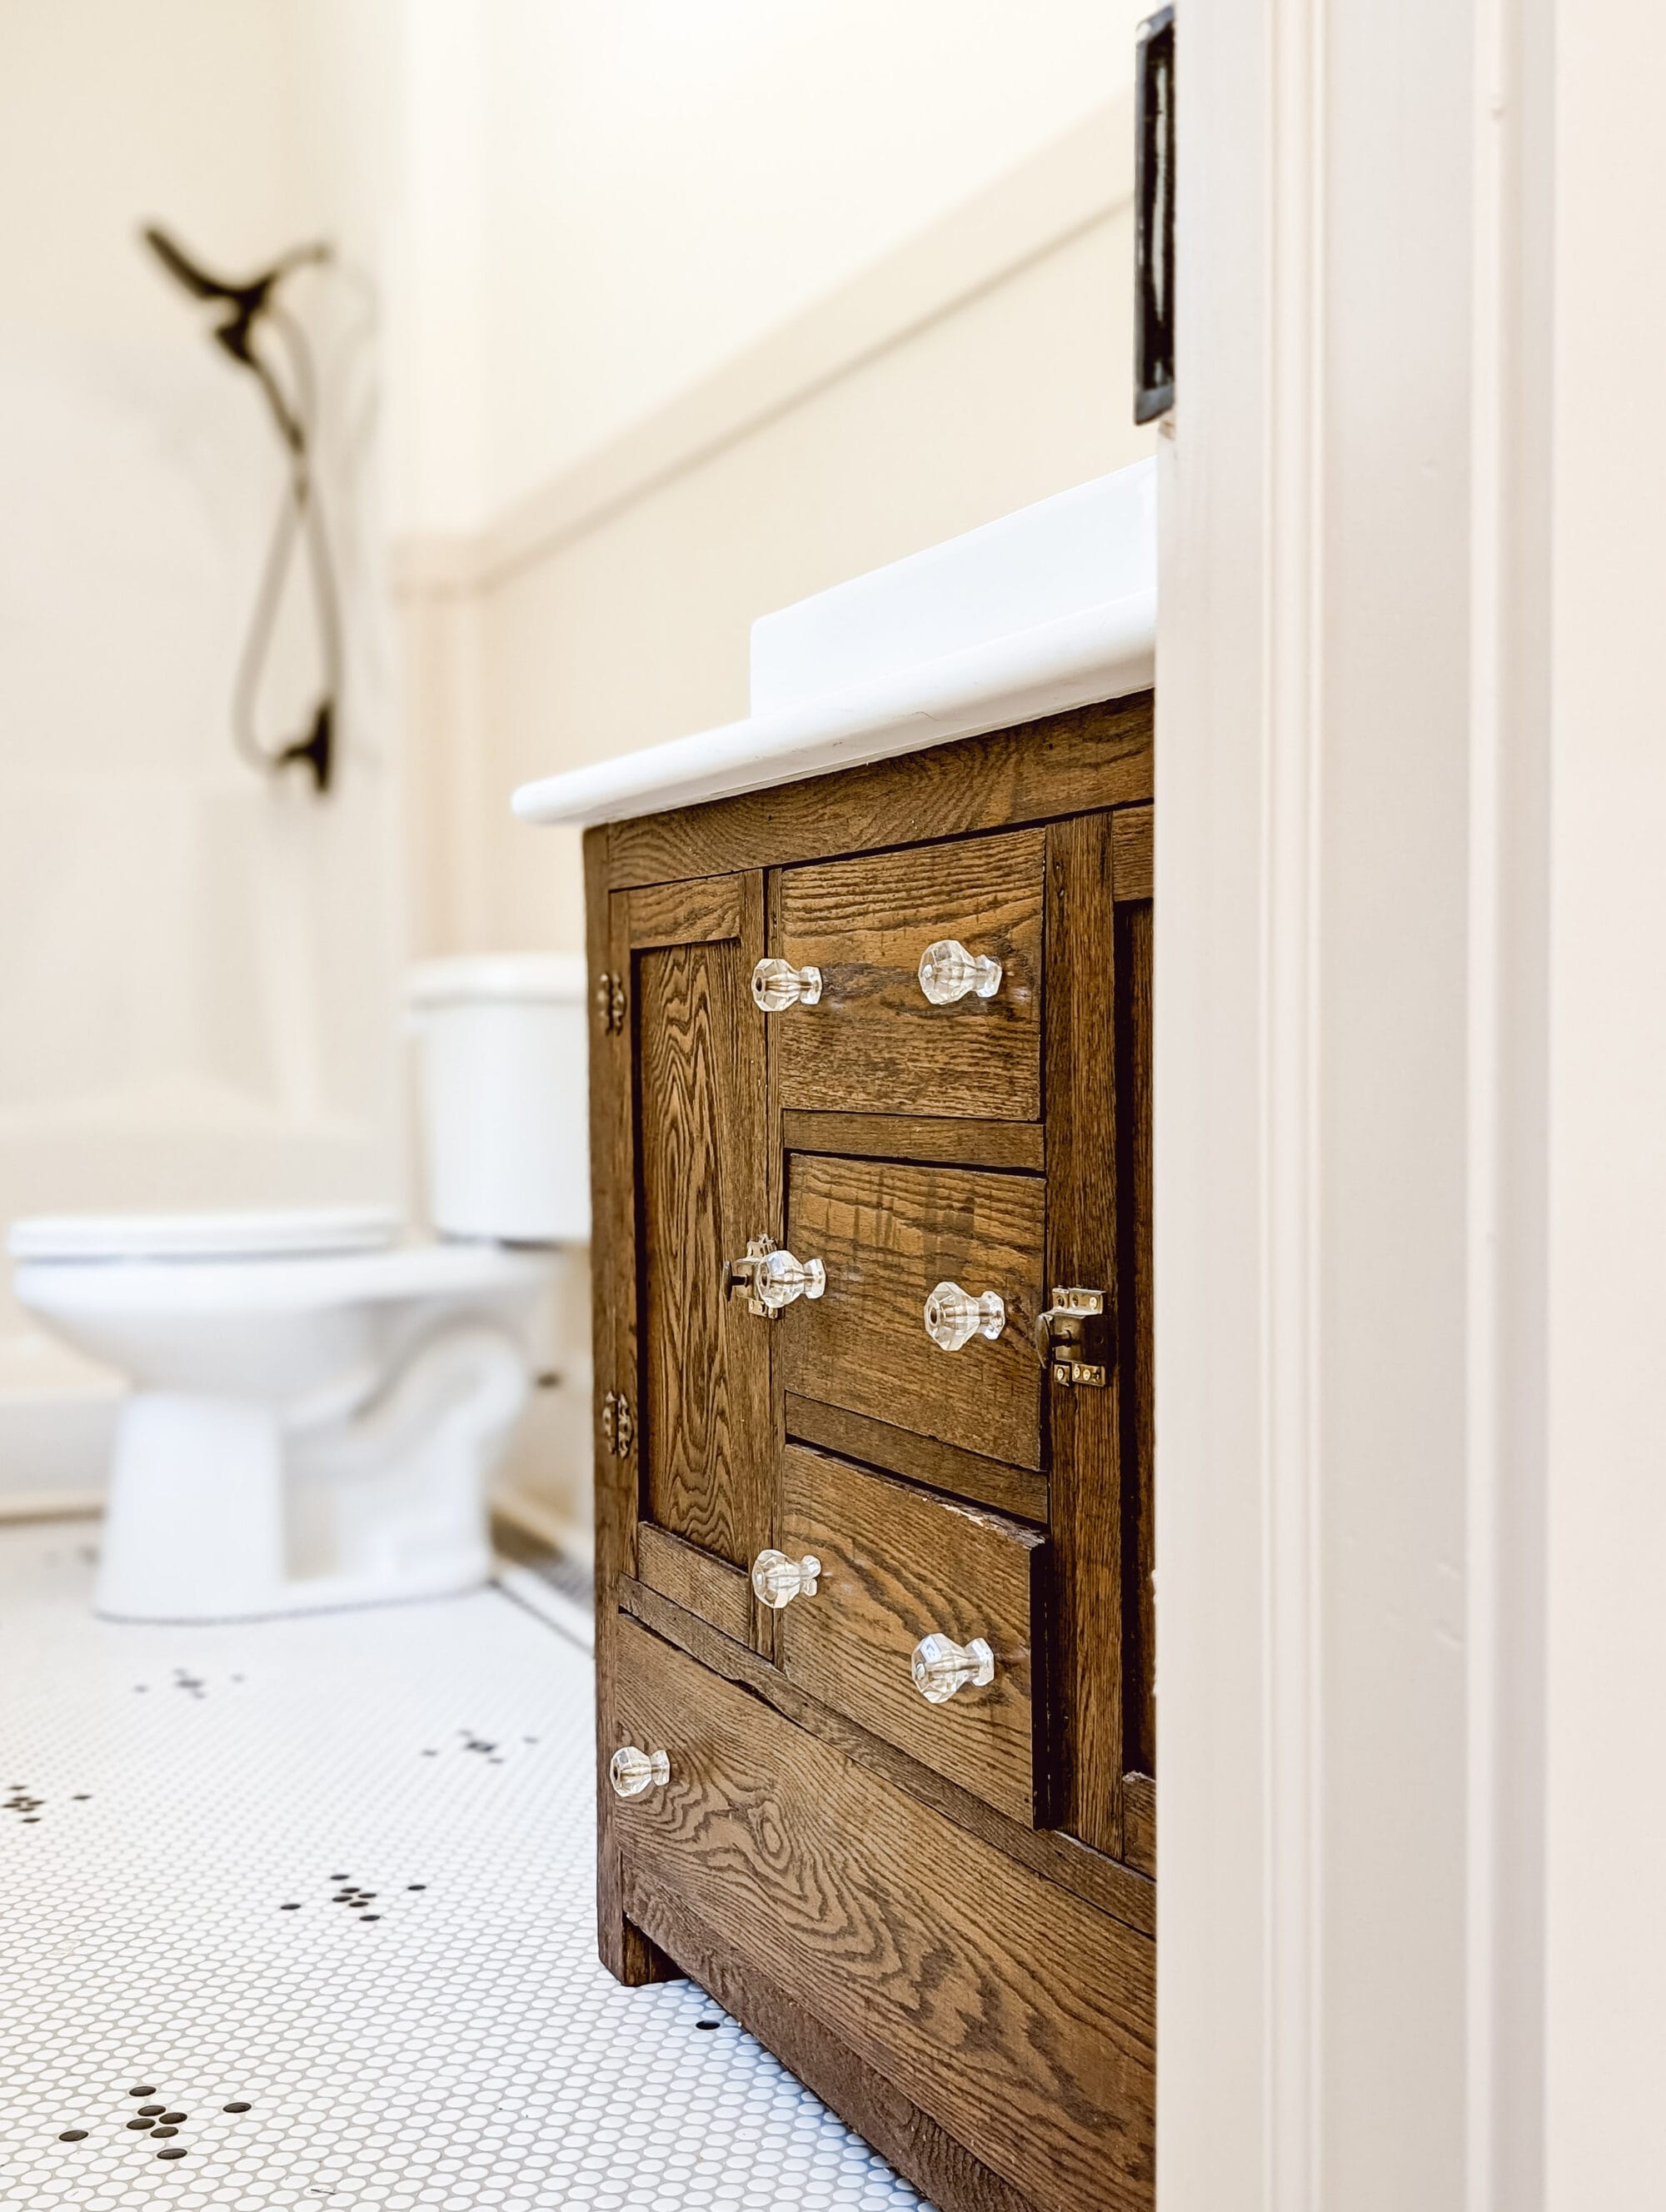
To make room for the plumbing, we had to give up a little space in the top 2 drawers.
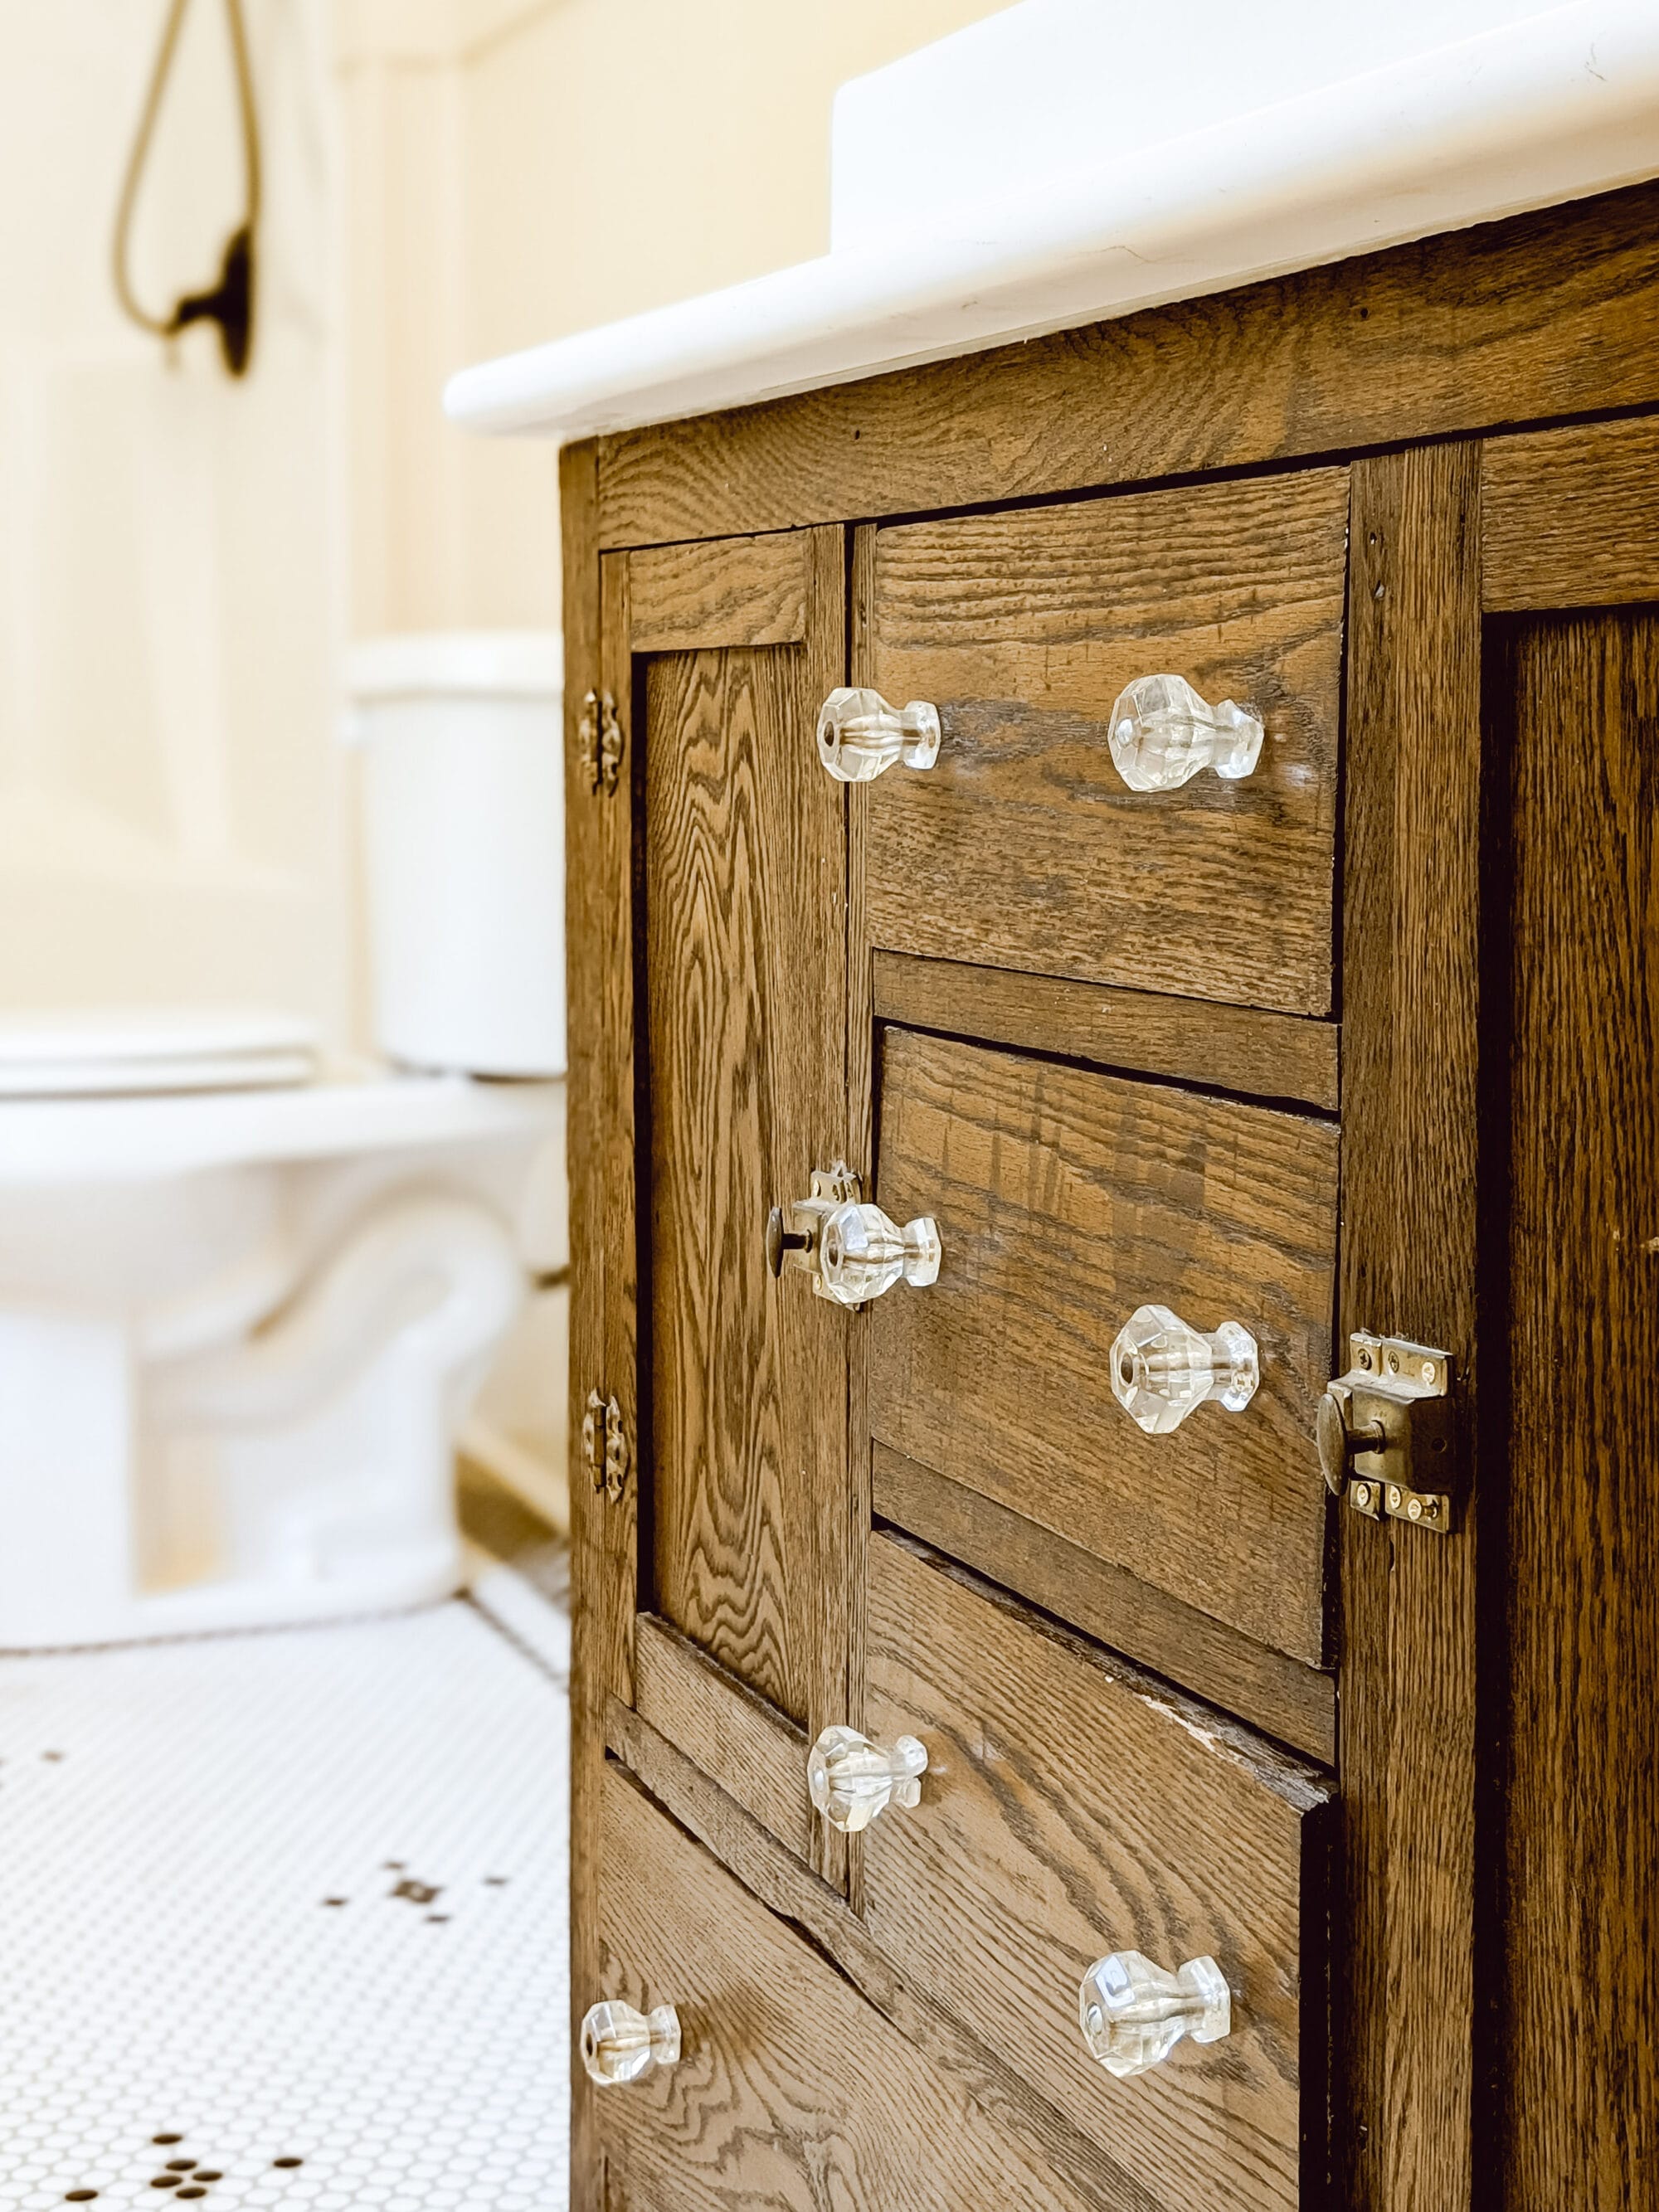
Our carpenter Sawyer Designs did a wonderful job shortening the drawers so they’re still functional, but leave room for the pipes to run through the back of the buffet and into the wall.
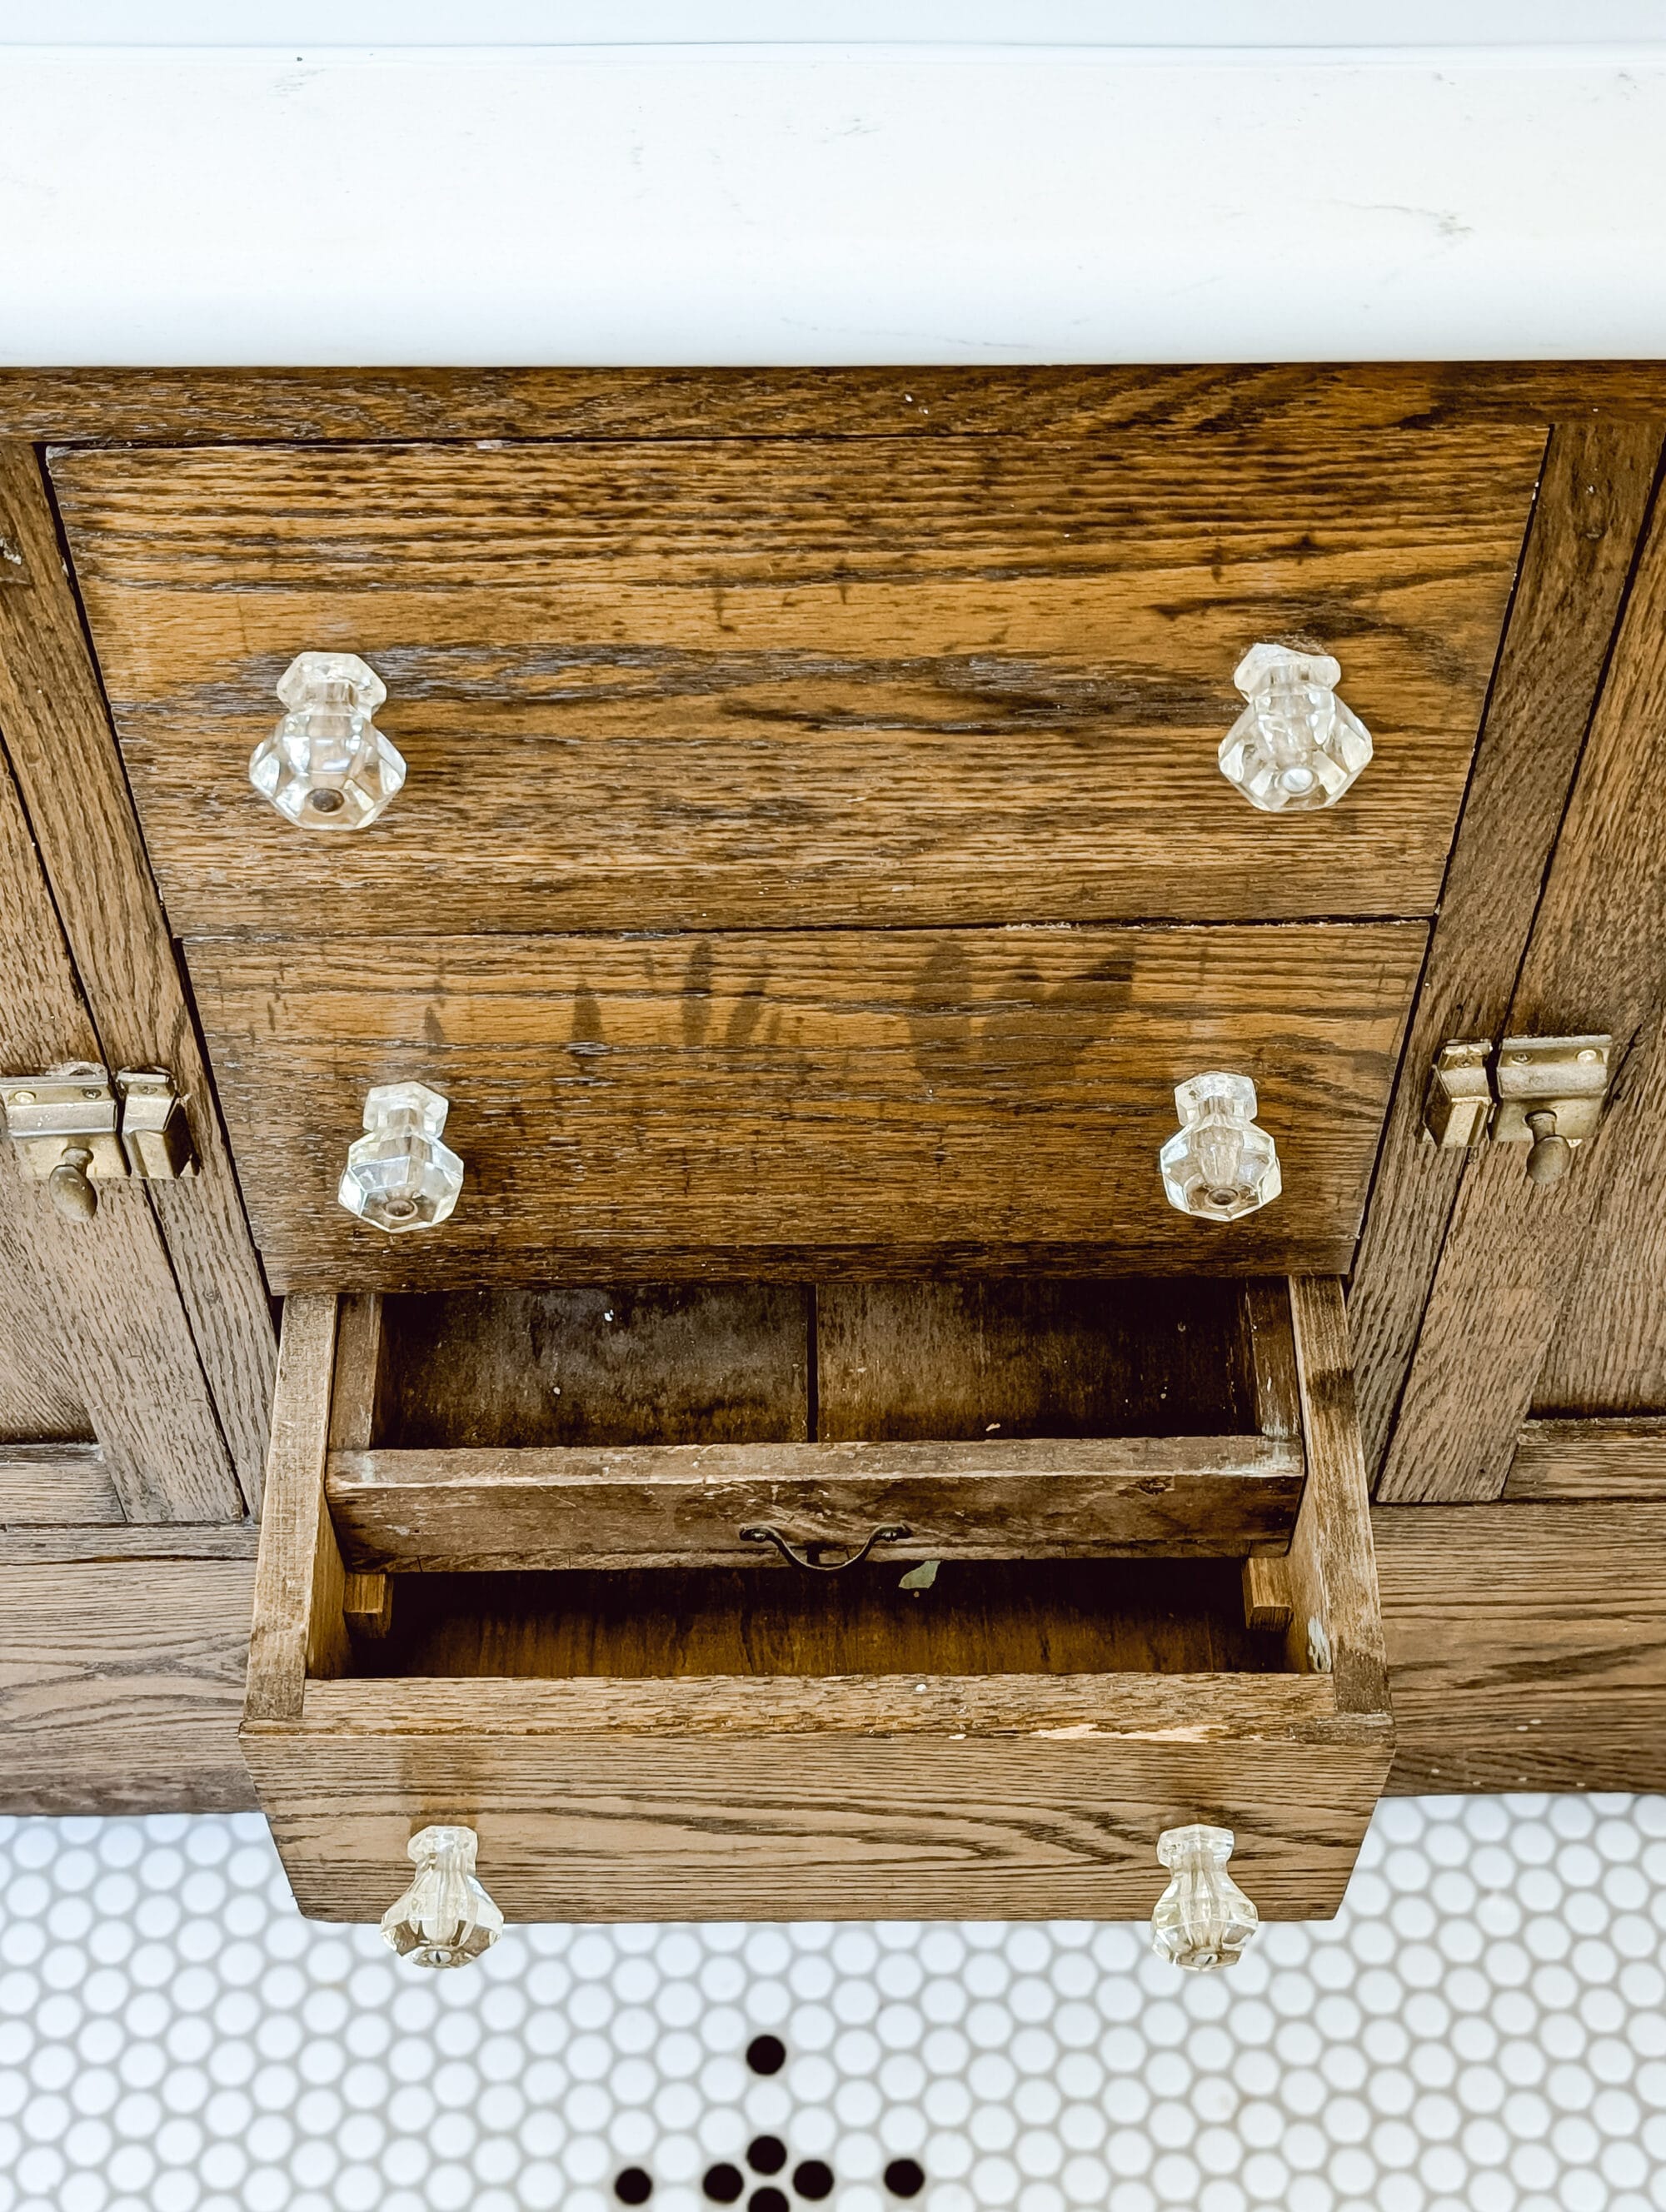
The plan is to paint the interior of the drawers white just to give it a fresh clean feel. But gosh this piece turned out so pretty!
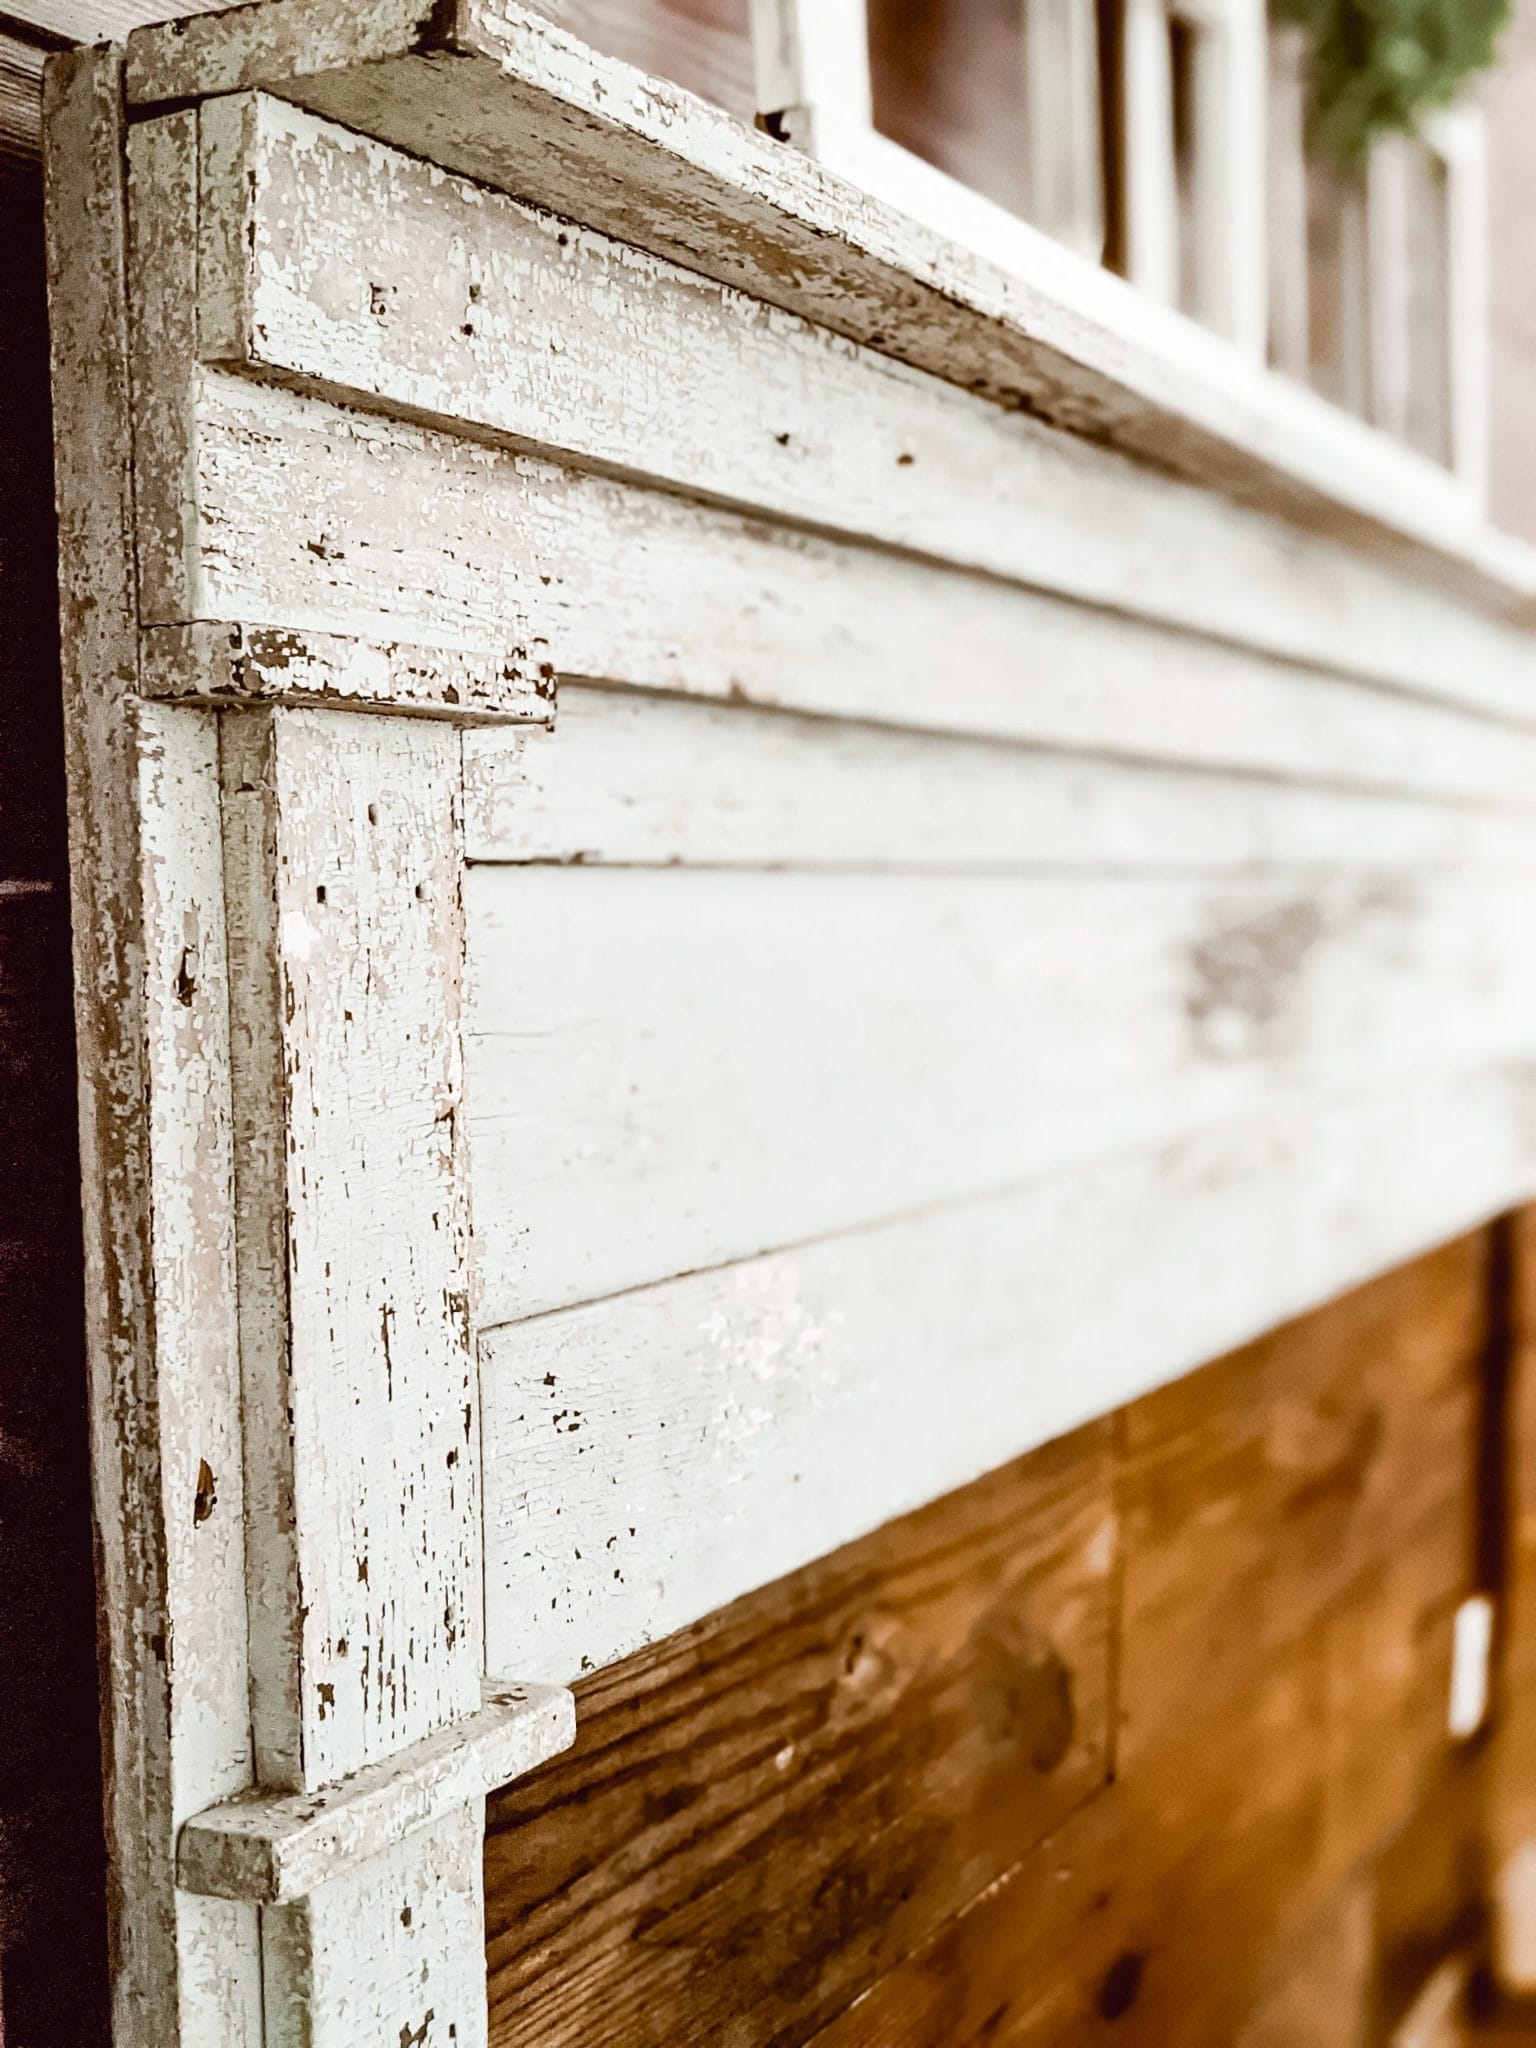
A Salvaged Door from our 1800’s Farmhouse
And then there’s the door!

This old door was the original door that led to my mother’s childhood bedroom in our farmhouse.
Did I lose ya?
Let me explain… If you’re new here or if you don’t know our backstory, my husband and I re-built the family farmhouse.
Have you taken the tour?
We re-built our family’s 1800’s farmhouse… and I put together a mini tour of the before photos!
And now, together with my parents, we’re building the cottage right down the gravel drive from our farmhouse.
We live in the farmhouse – and my parents will be living in the cottage!
The primary bathroom door over at the cottage was originally my mom’s old bedroom in the old house (our farmhouse).
We salvaged the door when we re-built the farmhouse, and now the door is back in my mom’s bedroom again.
It’s her new-old bathroom / bedroom door at the cottage. Such a special door, a full circle moment!
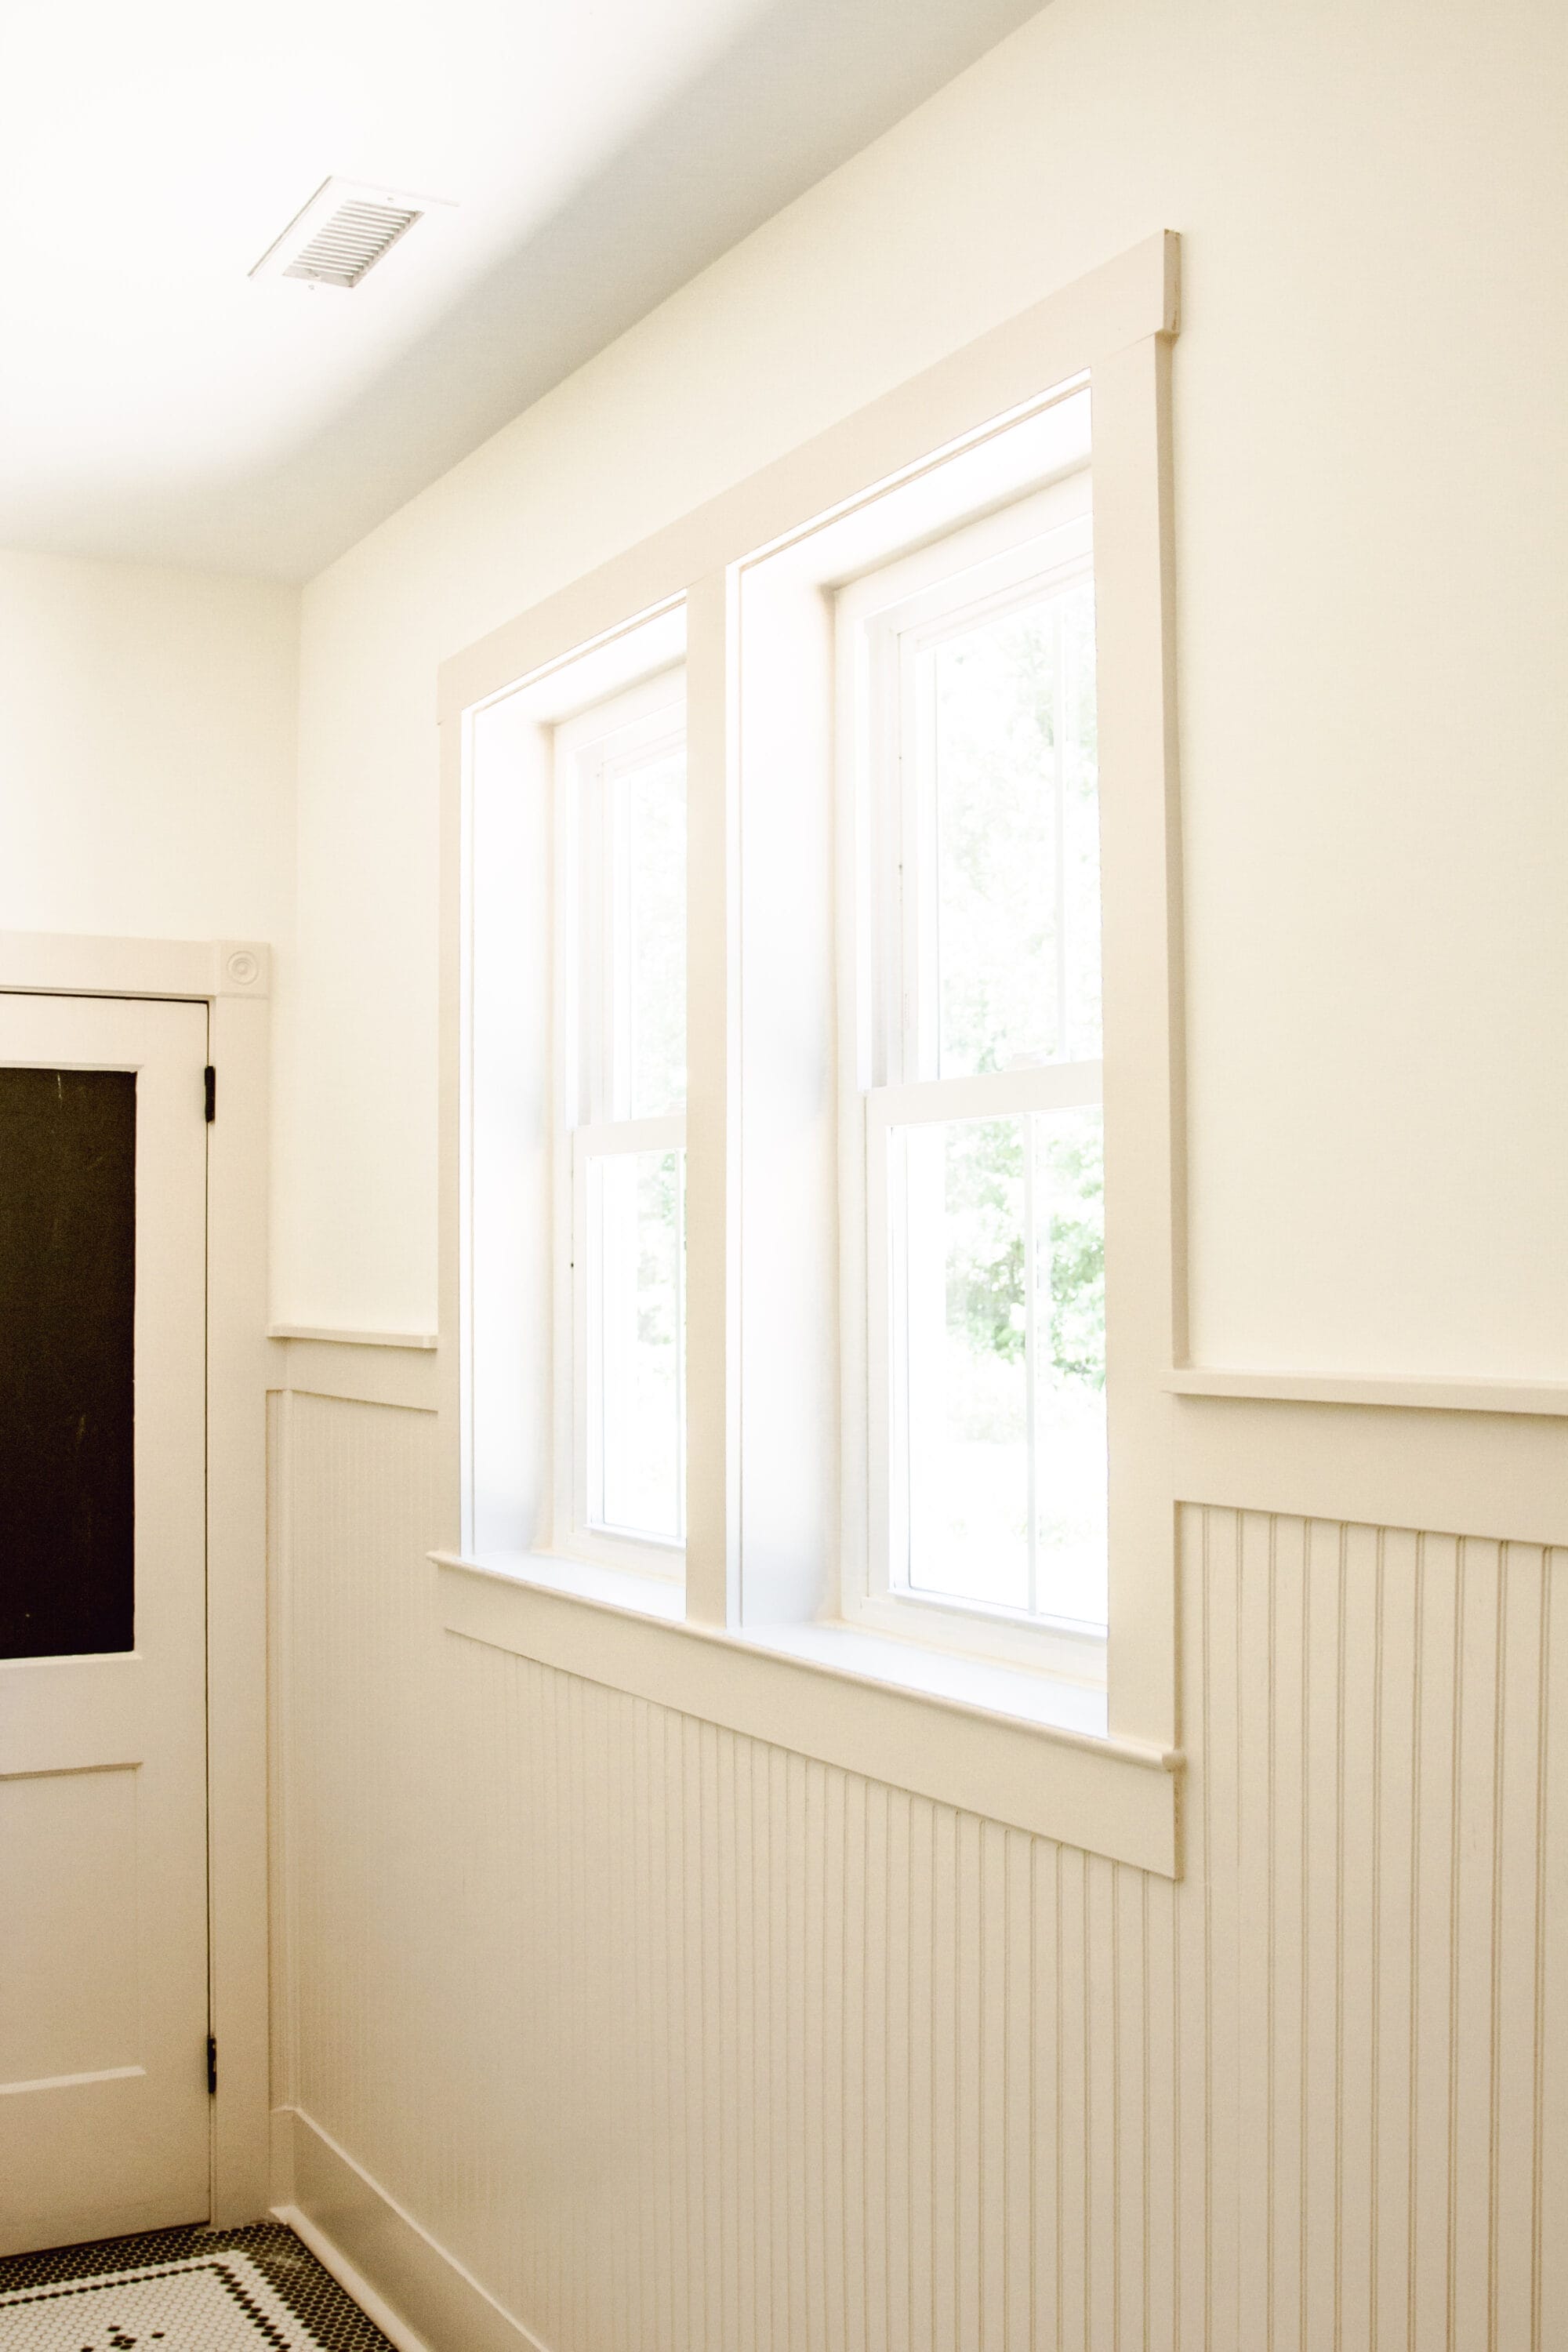
Cream Colored Walls and Tan Trimwork
Let’s talk paint colors next.
We went with a warm white color on the walls all throughout the cottage!

And for the interior doors and trimwork (baseboards, window casings, door casings, beadboard, etc.) we went with a taupey tan color.
I love the slight contrast between the two colors, and the more I think about it… the more tempted I am to re-paint all the trimwork here in our farmhouse.

What do you think? Should I go for it?
I’ll link both the wall color and the trim / door color below.
new old cottage
Interior Paint Colors
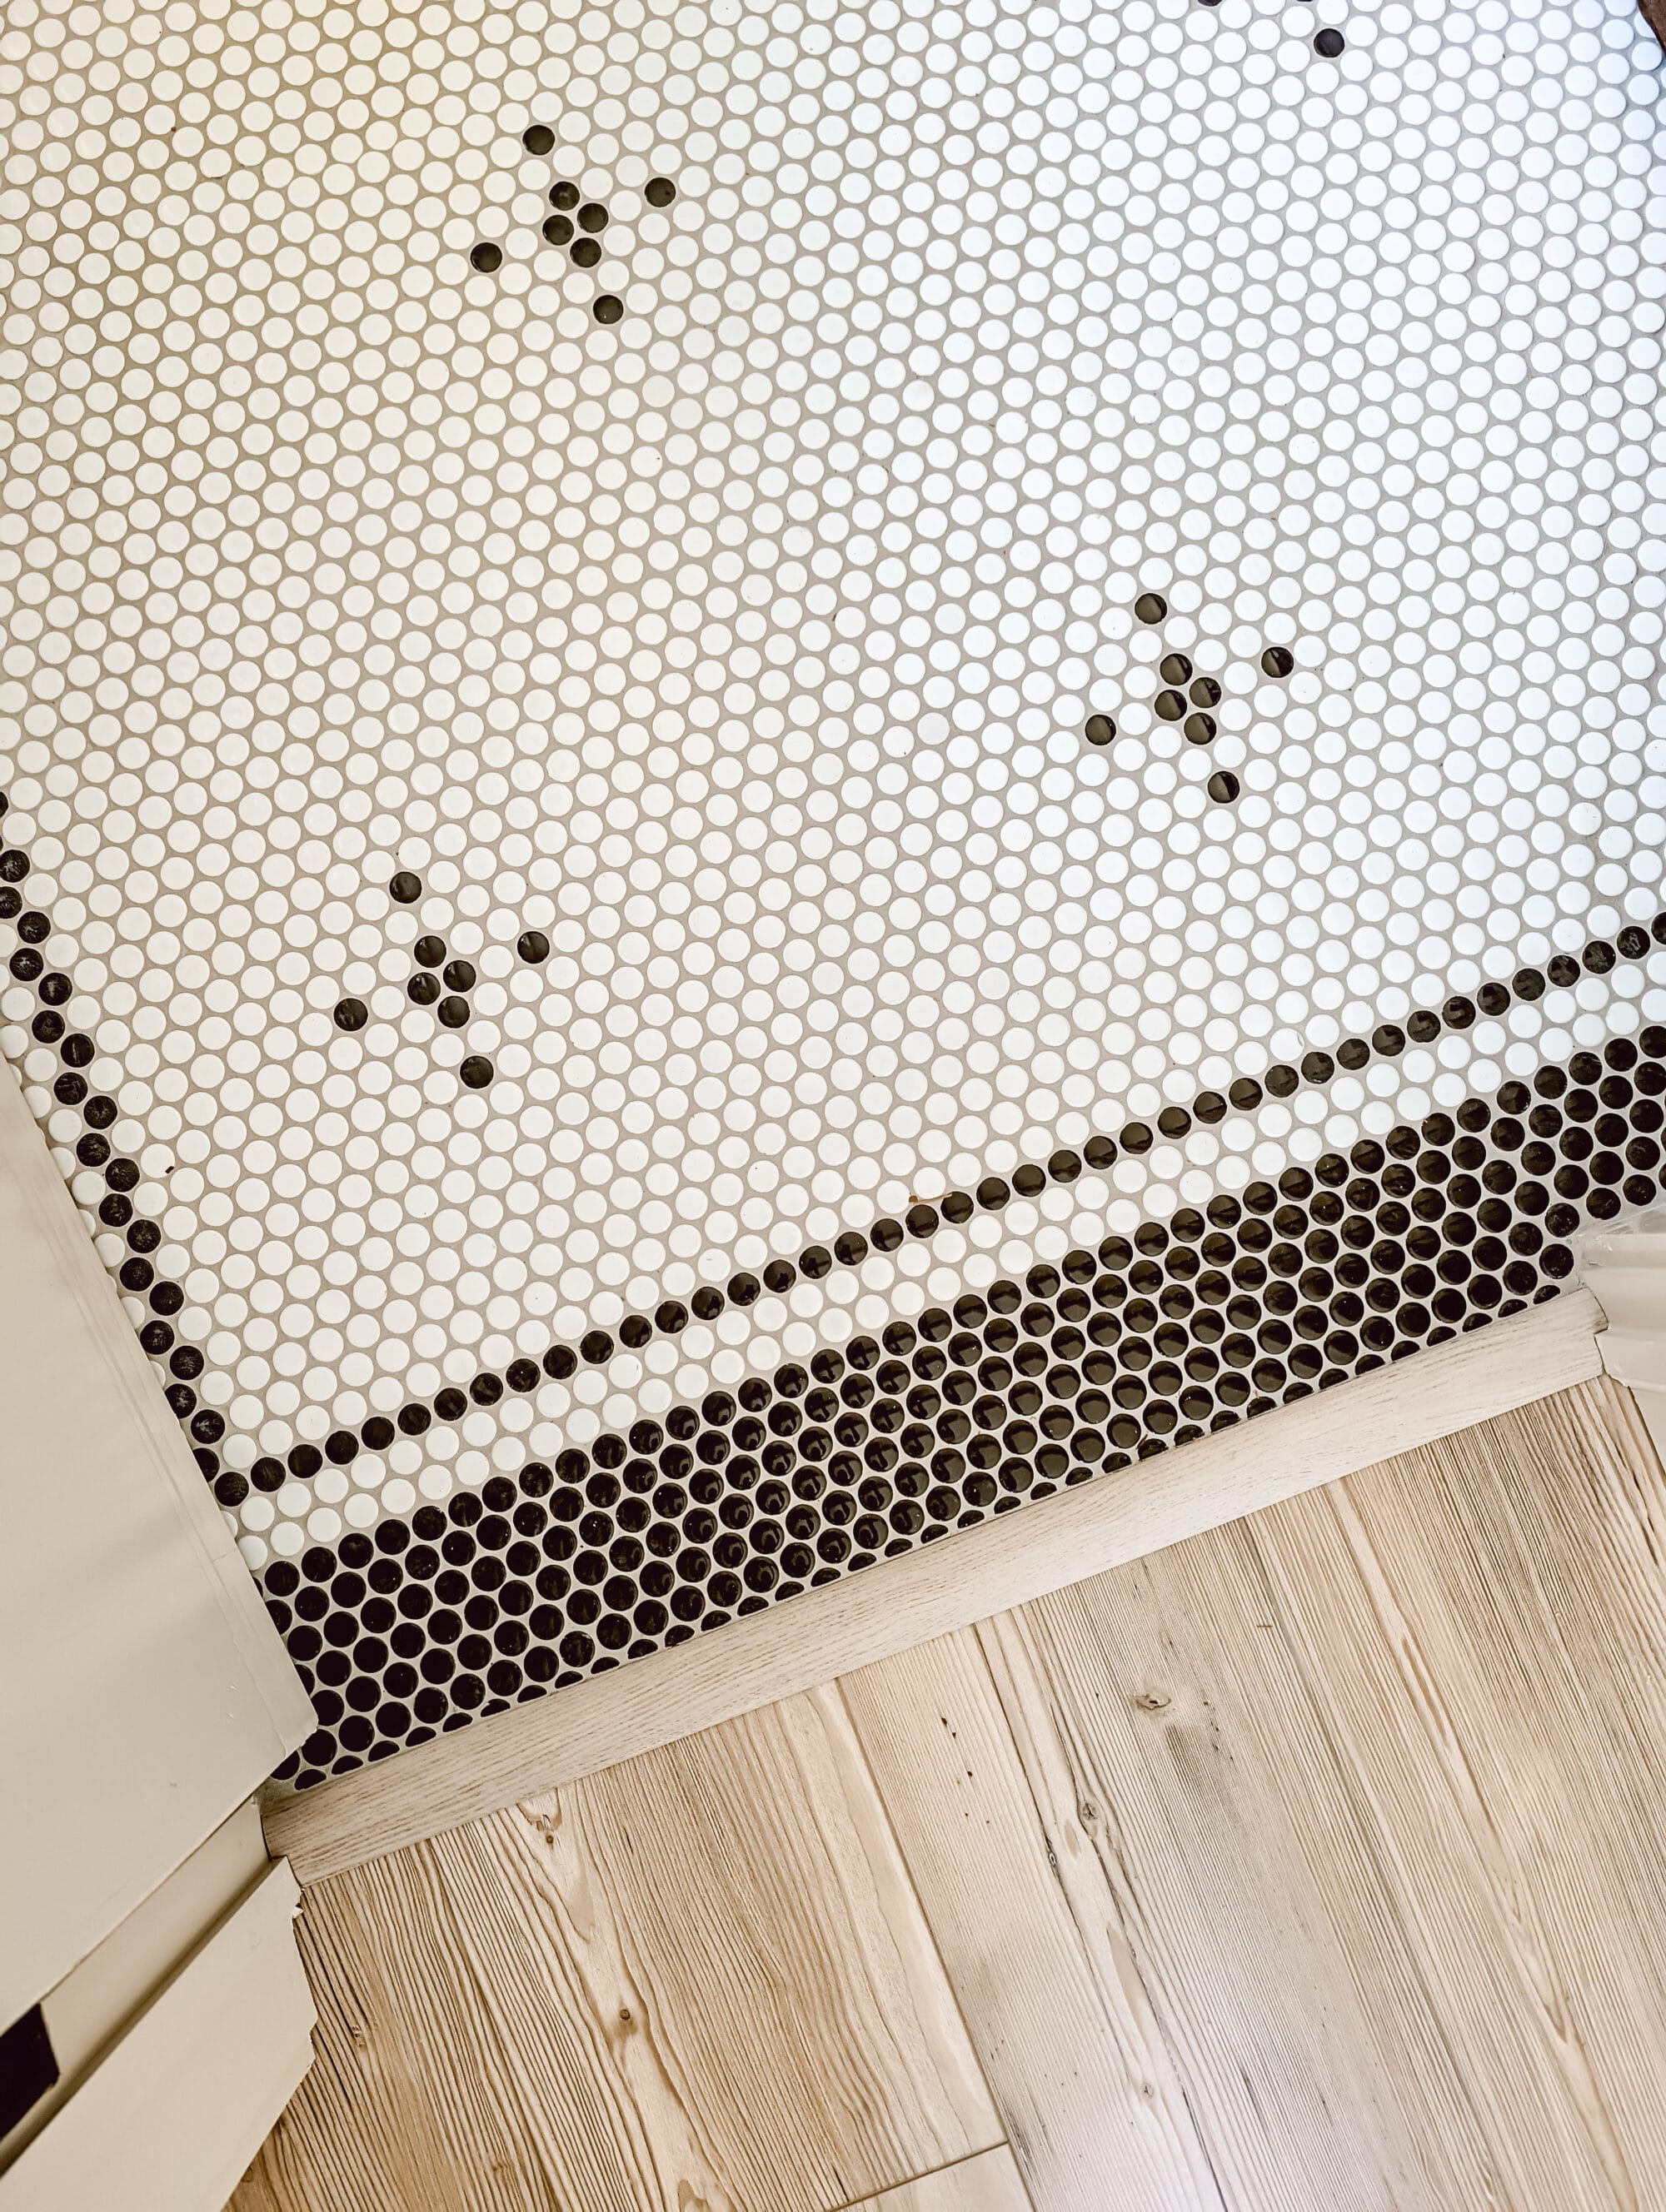
DIY Penny Tile Floors with a Classic Black and White Pattern
And finally, let’s chat about the floors!

These DIY penny tile floors are one of my favorite DIY’s I’ve ever attempted! I’m pretty proud of how they turned out.
What do you think of them?
We chose to combine these white penny tiles, and these black penny tiles to create a custom tile design in the primary bathroom.

I created a double border of black penny tile all around the perimeter of the bathroom. Then I added a pretty but classic pattern down the middle.
Did you catch the video I shared of this project over on my Instagram?
I am so proud of these pretty penny tile floors, and so happy with how they look in the cottage primary bathroom!
Cottage Primary Bathroom FAQ’s
how hard was it to do the tile the floor yourself?
Honestly – it was a lot of work! But I would do it again in a heartbeat.
To me it is so worth doing the tile yourself if you want to get a custom look but need to save money. Especially penny tile!
Larger tile will require you to make some cuts. Penny tile is so small it’s actually really easy to work with!
And doing it myself, I was able to play with the design and really make sure I loved the pattern and the spacing before I got started. It would have been harder for me to explain exactly what I wanted to a tile worker because I am a very visual person – I need to see it to know if I like it.
It took me roughly 3 full days to tile this space. 1 day to do a dry layout of the border / pattern. Another day to actually install the tile. And a final day to grout / clean.
Tilework is rough on your body and will leave you sore for a few days after. I highly recommend wearing knee pads or at least using a kneeling cushion.
It’s a hard DIY in the sense of the physical toll it takes on your body.
But, I will say, laying tile is definitely something you can teach yourself to do. There are so many Youtube videos out there that will walk you through the entire process step by step.
I would recommend watching a few of those, and then just go for it if you’re up for a challenge and don’t mind being a little sore for a few days after.
what’s left to do in this space?
- install peg hooks for towels / hanging storage
- hang a mirror over the sink
- add curtains, a shower curtain, a rug, and other bathroom accessories

when will we get to see the guest bathroom?
I’m sharing the Cottage Reveals in 5 parts. I’ll link them all below!
- The Cottage Exterior Reveal
- The Cottage Kitchen Reveal
- The Cottage Primary Bath Reveal (this post)
- The Cottage Guest Bath Reveal
- A Tour the Cottage
Once construction is completely done, and once my parents are all moved in… I’ll share updated photos of the entire cottage, inside and out, in a big “Tour of the Cottage”!
If you haven’t already… be sure to subscribe to my email list below, and I’ll send you a link to the guest bathroom reveal and the cottage tour as soon as it’s live on the blog!
Thanks for stopping by the blog today!

I loved getting to show you around our new-old cottage bathroom! And I hope you enjoyed it too!!
In the meantime, if you have any questions about the cottage, the primary bathroom, or something else I didn’t cover in today’s post… leave a comment below, or send me a DM on Instagram!
I’m happy to answer questions and share anything I can that might be helpful, or that you may just be curious about.
Until next time…